The Bretons emulate the Inca*
* = with all due honour to Lorenzo Mele for taking the (almost) totally** AxO Incas and through four games ravaging his "betters".
I wasn’t able
to paint a new set of Viking figures over the intervening week so I couldn’t
use a surprise Viking ally this week. So
with the same basic arrangement (only a slightly changed OoB) and the same
Frankish ally the Bretons have set out to actually test the plan.
Travellers
from far distant lands have bought word of the Sapa Inca’s glorious all** rAxO
victories and we have thus had our own beliefs in the power of pure “O”
ordinariness confirmed by the powers that be.
No change in
plans. Just the usual firm warning to
self – “stay with the plan”, so no generals in the front line this week!! And we are going to
need to be aware of CvS and impetuous LhS making our PiP shortage feel even more
acute.
Battle
Commences
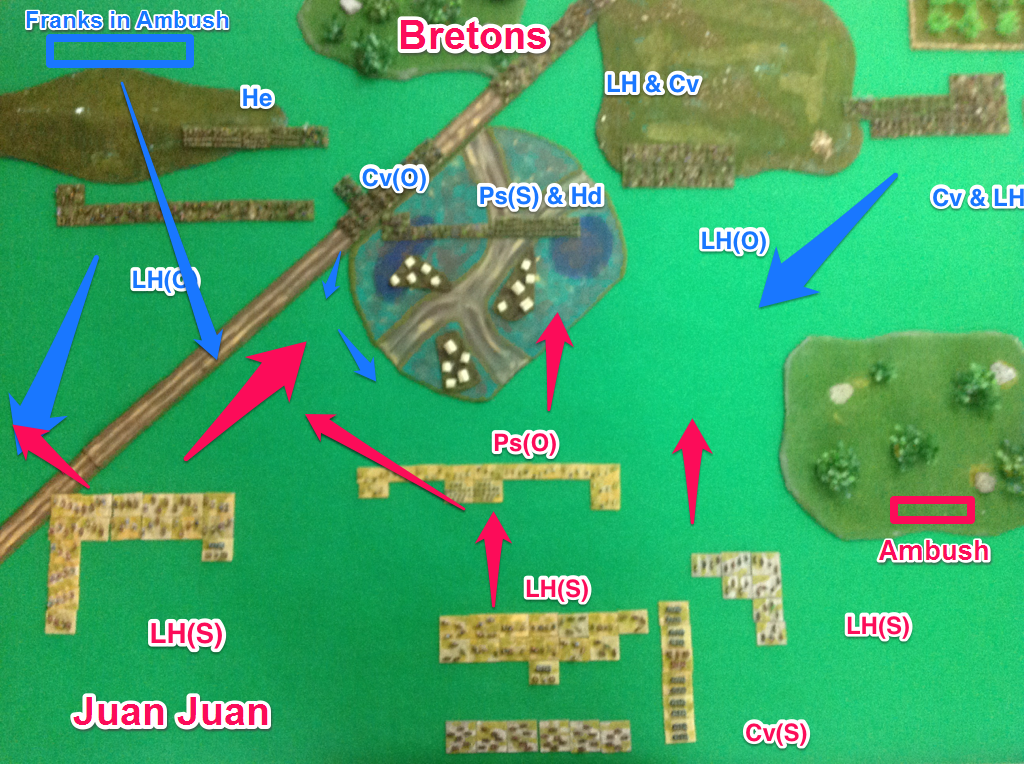
First good
point, the boys stayed at home, the Juan-juan, in all "S" mode***, have come to us but it’s a loooooong
way so the season rolled over one into the winter. But it's going to be a "O" vs "S" game - something I'm now regretting saying that I could cope with!!
Secondly we
got a good terrain layout. Maybe I’ve
overdone it with the BuA centre table but it’s the reason I bought a road in
the first place, to have more BuA placement options.

I knew the
central BuA would back fire on me – you CAN’T ambush from a unfortified
BuA. Caught it as Bob was deploying
after me so had to drop the troops on the table. (After the last embarrassment last year you’d
think I’d remember).
No sign of any
apparent Gok Turk allies but we’ll be outnumbered by PsO in the BuA area. Otherwise conservative deployment on both
sides.
 |
| We deploy with plenty of options to daze and confuse. |
1st Bound
Bob opens by
pushing Ps and Hd across the open towards the village (BuA) in centre table.
I push some Cv
in column around the village to threaten his weak foot and to see what he’ll do
a s a counter. My all Lh command goes
wide right leaving a gap between themselves and the Cv and forming an alley for
the ambushing Franks to use if the emeny advance strongly.
 |
| Baiting the Trap. |
Bob makes very aggressive march moves with a majority part of a LhS command that gets surprisingly close to the Cv. However he also splits the smaller part to go after my far right command.
 |
| Juan-juan response. |
2nd
Bound
We’re pleased
we’ve got the enemy impetuous LhS command split and with many PiPs available we
ran away with the Cv and attacked where we had superior numbers. By using multiple commands against one we
should have control and resilience.
The Franks are
released.
 |
| Triggering the trap. |
First combat
dice on the Lh lottery (at 2-1) was 1-5.
We died. After that we were
isolated but no more casualties but we dread the return bound.
However Bob
has only two PiPs plus impetunousness so hopefully not to much will occur.
3rd
Bound
We filled the
gap in the line. The LhS Juan-juan (CvS wannabe)
breaks through again!!

The Franks
maximise their distance and into the jaws of death they go – they can only die once
(per game actually).
Bob’s 3rd
command is crossing from centre to our right looking to fill gaps, save their
friends and destroy our small command. We
push reserves up the road.
On the left we
hold but importantly push a annoying few LhO around the wood into the enemy
rear.
Bob retaliates
– we’ll need Plan B now which is as Bob calls it “hot dice”. And the dice were smoking. Each side suffers Lh casualties.
4th Bound
Enough PiPs to
push the combats that are favourable including Franks into the rear of LhS,
several hard flanks and a risky position of a Cv in the village (but with
overlap support) in anticipation of the Franks coming through into the rear of the
opposing element. It turned out the
factors were worse than planed at (0 -1) but we pulled it off. One disheartened enemy command that was now
also outnumbered 2 to 1 and without support.
A good
bound. Now we await Bob’s revenge.
 | ||
| Going long & wide. A important PiP drain on Bob. |
He has plenty
of PiPs except for the disheartened command.
Let’s see what he’ll do with them.
The Franks
have trouble with being surrounded piecemeal and a clever PiP intensive
manouver sees the Frank general hard flanked, rolls 1-4 so dies as does a colleague
– command broken and small Breton command exactly disheartens with the knock on
effect.
We that’s the
Franks destroyed. But we’ve got some
options while our multiple groups ploy and the use of several commands against
individual enemy commands is making us very resilient.
 |
| Developing the weight of numbers on my right wing. |
The few LH
going around the wood into the enemy rear get ambushed from the back of the
wood. This takes several bounds to
resolve (4 LhS vs 4 LhO) and I eventual kill one LhS while losing all mine but
it importantly tied up BoB’s PiPs to control impetuous outcomes causing their
defeat and his right (my left) flank attack with CvS did not develop for those
few important bounds.
 |
| A HdO actually kills an enemy in anger!! |
More Bounds
BUT, a big
“but” is proving to be that, resilient or not, we don’t have a lot of effective
attack & damage options. We have to
slowly break up the enemy formations, surround and then take the hard flank
kill options – a slow process.
Things have
bogged down to picking off the odd enemy elements.
A couple of
bounds later a good set of combat outcomes sees a just disheartened enemy
command turn around and abandon the fight because if it losses one more element
than the three I have trapped and outnumbered in a LH lottery battle, then it
becomes a defeat for the Juan-juan.
 |
| Slowly making progress - but feeling decidedly 'toothless' though. |
Given that I
was also disheartened it was not such an easy task. Instead we broke but the multi-command in the
fight ploy had by now provided other non-disheartened troops to finish the
job. It turned out that my maths was a
bit out and in the last bound I thought I’d got the last element destroyed to
win the battle but it turned out I’d got one more than required.
So it was a slow,
often laboured undertaking but the all “O”ness plan worked out. However it was expensive and we had ME
casualties of nearly 43% - so scored at 17-8.

Note:- there
was no time limit and we played for a bit over 5 hours. However, because we normally play to
conclusions we don’t try and play at ‘speed’, often slowing/stopping to chat,
eat, joke or get otherwise distracted.
This week the time includes “live” blog entries as well.
** = Well almost totally, a few other grades snuck in.
*** = They were 95%+ mounted and all the mounted, both Cv and Lh were "S" grade. The small number of foot were iPsO and iHdO.


