Thursday 20 June 2013

Making the Brest* of Things

Damaging the myth of "S" superiority.


Having dealt to the Juan-juan last week we found the Qarakhanids were close behind them and invaded Brittany this week.

Both players were less than a 100% fit due to sleep deprivation (from the long march from the Tamin Basin?) and a gout flare-up (too much consumption of well matured Frankish grapes?) but we like our weekly games so played on anyway.  Of course the excuses were already declared!!
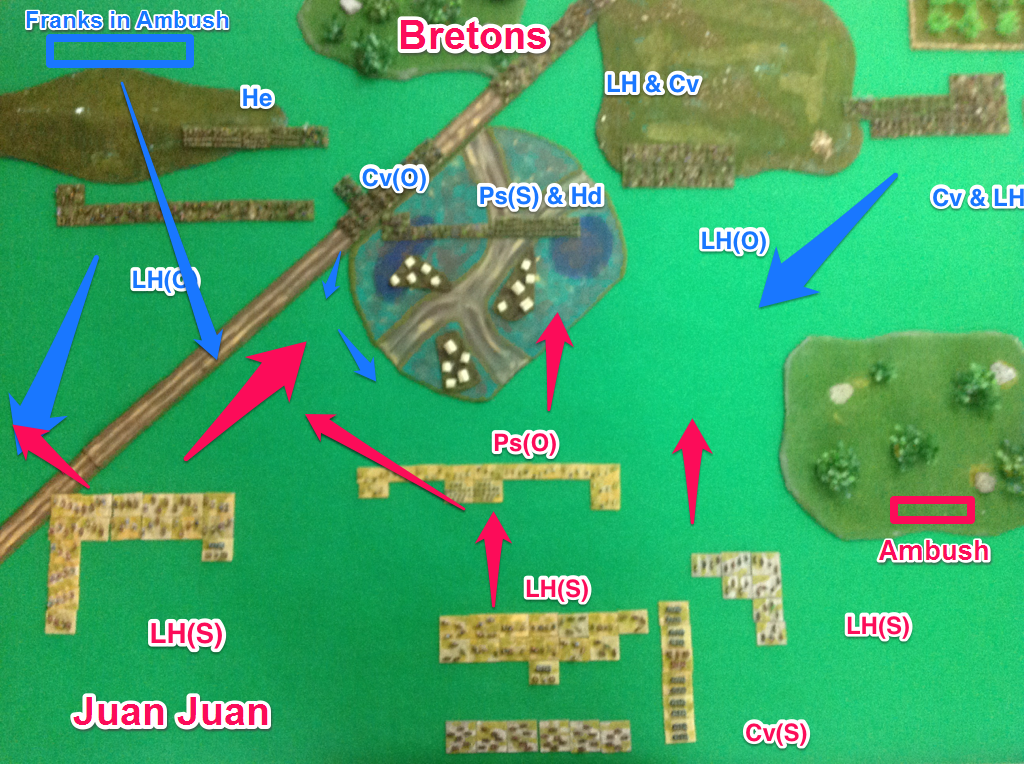
Our defensive position was okay.  I took the time to ask Bob if there was movement room around the Wood on his left flank, to which he confirmed there was although just an element wide.  In his deployment he placed 4 PsO at the inner rearward corner of the wood to obstruct anything circumnavigating it, which left me with many moves agonising over whether it was a ambush trap in the wood.  

We deployed to stretch across the table and pull the enemy back and forward and as planned we were in several groups to give options on where to employ our PiPs.  The Qarakhanids had an smallish ally front and centre (unreliability insurance) and general the Lh forward and the Cv to the rear so it could be deployed to points of need, especially the unexpected regular “S” Ghilman.  Bob also had a regular CinC with irregular sub-generals to utilise some PiP exchange rules.

From the deployment our plan was to run wide right around both flanks, push into a gap we saw in the enemy line allowing us to separate and gang-up on a lone enemy command, plus to hold the line elsewhere.  It involved low PiP requirements for us but should cause higher PiP usage to respond to all the threats.  An spontaneous plan was adopted with their initial 5 PiPs, to march the Franks from left to right and go hunting the concentration of cavalry on the right (Bob’s left).  To achieve that we’d have to smash through the Horde line first, something the KnF do very well.

The Qarakhanids respond to the limit of their PiPs and space but don’t appear to be too aggressive.  Once they see where the Franks are going they come forward en-mass to try and interfere and prevent the Franks getting to the far right where the CvO is the best target and instead force the Franks to engage the CvS behind the left of the Horde line.  This was not something I wanted to do because they would get first charge with “S” on “F” outcomes.


On the left, Bob’s right there is a game of cat and mouse as his all Lh command dances with a mixture of double ranked Breton Lh and some Cv that had formed an inverted “V” to entrap the enemy. 

Once they did engage the Bretons did better from their depth, greater numbers and the occasional Cv at better factors.  Casualties on both sides but the Qarakhanids’ were occurring a bit faster and leaving exploitable gaps.

At this point a phantom elephant passed along the battle field causing much fear in the Breton commander**.

On the right, after agonising over the ambush danger I sent a couple of LhO around the wood.  There was no ambush and Bob commented that after my setup time questions on the route that it would have been so obvious that he never thought I’d do it.  The rest of them moved between the wood and the orchard (containing our PsS ambush) to be a flank threat to the Frank attack expected in a couple of bounds.

Unfortunately these did trigger a ambush from the front left of the wood  and some very canny rules use saw the “turn to a flank attack with no space” situation resulted in my Lh being sucked into the wood and fighting with difficult going factors plus double overlap and no recoil.  From -2 to 2 we diced our way out of it!!


We did spring our PsS ambush on the ambushers but just to scare them away from the fight.  To me this was a side show and I took some casualties here because I didn’t get the PiPs to really try and extract them.  They were holding the line which was their job and should only die slowly anyway!
In the centre I protected the Franks flank to try and get them into the best location but didn’t pick any major engagements. 

On the left we continued to react to the enemy engaging us and gain that slow advantage in casualties and position.

It was all going to come down to the battle around the Franks attack.  I had lots of support around that area, positions to make overlaps and a greater element count.  I was prepared for a battle of attrition.

The Franks are closed down by the Horde and aren’t able to pass along the line as far as desired.  Impetuously they turned in the Hordes ZoCs and engage the left end (my view) of the line rather than the right end.  The Frank general is not engaged but provides an overlap on the far left.
 
Sorry, this is the LAST Photo before operator error cause the loss of subsequent shots.
One bound and the five elements cut through the Horde, to a man.  Of course they are now counter charged by the rCvS Ghilman, that dreaded “S” on “F” situation being intentionally used by Bob.

The dicing is completed and one Frank is dead (of six, the general now engaged and overlapped by LhS), two recoiled, and most importantly a Ghilman and a CvO repulsed.  Survival - now retaliation!!

Retaliate we did, filling the gaps with Breton Cv to maintain overlap factors, the Franks knights charged through, into and over the Ghilman and Cv using the Kn own bound QK.  The command demoralised and teeters near breaking.  And next bound was not looking to dangerous due to the sudden lack of Ghilman, just the CinC plus one surviving and then we could recharge again.

However we had also had a good round of rear attacks and such positional advantage combats that the left hand Qarakhanid (their right) command broke and the knock on effect broke the CinC’s command and the army.  Battle over with losses of only 7ME out of the 91 ½ME  A 8 element ambush was never declared.

The defeated’s closing comments were that the volume of cheaper LhO is better than the lesser numbers of quality iLhS in the light horse fights (cum lotteries).  While it is a premise behind the Bretons to be fair I also think that they need to be double ranked, played conservatively and not stray too far from some CvO support.  Don’t take undue risks, take only advantageous combats and sooner or later a bad PiP role will see the iLhS go impetuous and put themselves in danger (although it didn’t happen in this game).

Today the Bretons again played at being bigger, wider and enveloping the enemy when it was to our advantage and avoiding combat when a disadvantage.  It worked.  Maybe it helped that there was no PiP crisis (but that’s part of the conservative attack plan) and the combat dice may have been slightly tilted in my favour.  The Qarakhanids didn’t have the manoeuvre control or numbers to counter all the probes over such a wide area and had to make some less than ideal counters.  And their Ghilman were a bit unlucky in their one charge that didn’t quite play to the odds.
 
*  =  A major town in Brittany in need of defence.  A few breasts also needed protected from the raging asiatic hordes of barbarians a task that we excel at.


** =  I was checking base positions with Bob’s after his move where a group had developed some gaps within the group formation.
Pointing to the distance between his Hordes and the orchard Bob says  “There’s an elephant*** wide gap down here”.  Hang on I thought, there’s no El on the table, unlikely to be able to ambush into that location and I’m sure CATs can’t have El options anyway.  But my heart skipped a beat because an El at that point would be a disaster.  So I had to ask for fear of having missed the obvious.  Luckily it was a phantom.

*** =  slip of the tongue, should be “element”.

Sunday 16 June 2013

Average Joe Breton Rides Again

The Bretons emulate the Inca* 

* = with all due honour to Lorenzo Mele for taking the (almost) totally** AxO Incas and through four games ravaging his "betters". 

I wasn’t able to paint a new set of Viking figures over the intervening week so I couldn’t use a surprise Viking ally this week.  So with the same basic arrangement (only a slightly changed OoB) and the same Frankish ally the Bretons have set out to actually test the plan.

Travellers from far distant lands have bought word of the Sapa Inca’s glorious all** rAxO victories and we have thus had our own beliefs in the power of pure “O” ordinariness confirmed by the powers that be.

No change in plans.  Just the usual firm warning to self – “stay with the plan”, so no generals in the front line this week!!  And we are going to need to be aware of CvS and impetuous LhS making our PiP shortage feel even more acute.


Battle Commences
First good point, the boys stayed at home, the Juan-juan, in all "S" mode***, have come to us but it’s a loooooong way so the season rolled over one into the winter.  But it's going to be a "O" vs "S" game - something I'm now regretting saying that I could cope with!!

Secondly we got a good terrain layout.  Maybe I’ve overdone it with the BuA centre table but it’s the reason I bought a road in the first place, to have more BuA placement options.

I knew the central BuA would back fire on me – you CAN’T ambush from a unfortified BuA.  Caught it as Bob was deploying after me so had to drop the troops on the table.  (After the last embarrassment last year you’d think I’d remember).

No sign of any apparent Gok Turk allies but we’ll be outnumbered by PsO in the BuA area.  Otherwise conservative deployment on both sides.
We deploy with plenty of options to daze and confuse.


1st Bound
Bob opens by pushing Ps and Hd across the open towards the village (BuA) in centre table.

I push some Cv in column around the village to threaten his weak foot and to see what he’ll do a s a counter.  My all Lh command goes wide right leaving a gap between themselves and the Cv and forming an alley for the ambushing Franks to use if the emeny advance strongly.


Baiting the Trap.


Bob makes very aggressive march moves with a majority part of a LhS command that gets surprisingly close to the Cv.  However he also splits the smaller part to go after my far right command.
Juan-juan response.


2nd Bound
We’re pleased we’ve got the enemy impetuous LhS command split and with many PiPs available we ran away with the Cv and attacked where we had superior numbers.  By using multiple commands against one we should have control and resilience.

The Franks are released.

Triggering the trap.
First combat dice on the Lh lottery (at 2-1) was 1-5.  We died.  After that we were isolated but no more casualties but we dread the return bound.  

However Bob has only two PiPs plus impetunousness so hopefully not to much will occur.

3rd Bound
We filled the gap in the line.  The LhS Juan-juan (CvS wannabe) breaks through again!!


The Franks maximise their distance and into the jaws of death they go – they can only die once (per game actually).

Bob’s 3rd command is crossing from centre to our right looking to fill gaps, save their friends and destroy our small command.  We push reserves up the road.

On the left we hold but importantly push a annoying few LhO around the wood into the enemy rear.

Bob retaliates – we’ll need Plan B now which is as Bob calls it “hot dice”.  And the dice were smoking.  Each side suffers Lh casualties.

4th Bound
Enough PiPs to push the combats that are favourable including Franks into the rear of LhS, several hard flanks and a risky position of a Cv in the village (but with overlap support) in anticipation of the Franks coming through into the rear of the opposing element.  It turned out the factors were worse than planed at (0 -1) but we pulled it off.  One disheartened enemy command that was now also outnumbered 2 to 1 and without support.
A good bound.  Now we await Bob’s revenge.
Going long & wide. A important PiP drain on Bob.

He has plenty of PiPs except for the disheartened command.  Let’s see what he’ll do with them.
The Franks have trouble with being surrounded piecemeal and a clever PiP intensive manouver sees the Frank general hard flanked, rolls 1-4 so dies as does a colleague – command broken and small Breton command exactly disheartens with the knock on effect.

We that’s the Franks destroyed.  But we’ve got some options while our multiple groups ploy and the use of several commands against individual enemy commands is making us very resilient.

Developing the weight of numbers on my right wing.

The few LH going around the wood into the enemy rear get ambushed from the back of the wood.  This takes several bounds to resolve (4 LhS vs 4 LhO) and I eventual kill one LhS while losing all mine but it importantly tied up BoB’s PiPs to control impetuous outcomes causing their defeat and his right (my left) flank attack with CvS did not develop for those few important bounds.


A HdO actually kills an enemy in anger!!


More Bounds
BUT, a big “but” is proving to be that, resilient or not, we don’t have a lot of effective attack & damage options.  We have to slowly break up the enemy formations, surround and then take the hard flank kill options – a slow process.

Things have bogged down to picking off the odd enemy elements.

A couple of bounds later a good set of combat outcomes sees a just disheartened enemy command turn around and abandon the fight because if it losses one more element than the three I have trapped and outnumbered in a LH lottery battle, then it becomes a defeat for the Juan-juan. 
Slowly making progress - but  feeling decidedly 'toothless' though.
Up until now we’d had a stand-off in the village but a quick burst of intentional action by the Breton PsS (lead by Bob the pink attired colour blind Breton) saw enemy PsO hard flanked and destroyed, enough to get the required MEs.  Now to deal to those three surrounded enemy disheartened LhS. 

Given that I was also disheartened it was not such an easy task.  Instead we broke but the multi-command in the fight ploy had by now provided other non-disheartened troops to finish the job.  It turned out that my maths was a bit out and in the last bound I thought I’d got the last element destroyed to win the battle but it turned out I’d got one more than required.

So it was a slow, often laboured undertaking but the all “O”ness plan worked out.  However it was expensive and we had ME casualties of nearly 43% - so scored at 17-8.


Note:- there was no time limit and we played for a bit over 5 hours.  However, because we normally play to conclusions we don’t try and play at ‘speed’, often slowing/stopping to chat, eat, joke or get otherwise distracted.  This week the time includes “live” blog entries as well.

** = Well almost totally, a few other grades snuck in.
*** = They were 95%+ mounted and all the mounted, both Cv and Lh were "S" grade.  The small number of foot were iPsO and iHdO.


Friday 14 June 2013

The Bretons are coming again

 Well it''s game night again, and since Mr Watts has opined that his Bretons can handle a steppe army, tonight I'm going to use The Wriggly Worms, The Juan Juan.

There seems to be an awful lot of terrain for two cavalry armies, but here I am invading Brittany on a cold winter's morning.

BUA in the centre, two woods, an  orchard, a bog and two gentle hills
His position is pretty tough to attack, so I think the central BUA will be pivotal. I'll concentrate my psiloi there, then shift my forces to concentrate one side or the other after I see his deployment.

Deployment
 Turn 1
Turn one sees Wayne advance his cav around the village, and move his CinC from his extreme left towards the center. I got six pips for my left, so was able to pounce on the cav and still fend of the left hand column. In the center my psiloi scurried for the village.

Turn 2
Wayne got good pips and did an abrupt about turn in the center while opening the action on my left.

Franks. Not totally unexpected
And to no-ones surprise the Franks have turned up from ambush behind the hill on my left


Won the first roll in the light horse lottery, killing an element on a factor 1 vs 2
. Bagged another one in my turn to even up the numbers on that side. Due to lack of pips I  had to advance all my LH towards the BUA, but didn't t kill the cav that I caught.


Turn 3
Franks charge forward. LH from my centre come over to counter
The Franks charged forwards and the light horse fight developed on the left where things started to go bad due to poor pips and poor combat dice. On the other flank a group of Bretons came sneaking round the wood, but were surprised by my ambush that was in the rear edge of the wood

Turn 4
The Franks have plenty of pips, was hoping they'd have a crisis, but they split up, and kill some light horse from my left. Things continue to go badly for that command and it disheartens then breaks. However, good pips with my column from the center allow them to launch a devastating counter attack on the Franks, breaking them. This in turn disheartens the light horse command next to them.

Turn 5
Mostly mopping up, most of the Franks cleared off, and one more was killed to shatter the command. On the right the small  group behind the wood was finished off. On the left Wayne marshalled his forces for a counter attack.

Turn 6
Skirmishing to the left of village., took a loss but could have been worse. Poor pips made it hard to collect the group behind the wood, Mild excitement as one of Wayne's horde killed a psiloi in the village.

Turn 7
A bit broken up on the left, looks like the counter attack is going to be nasty..

... which it was, bringing my central command close to broken. On the plus side I broke the small cavalry command on the left, and began to move forwards with my Cv(S) on the right. The runp of the center withdraws.

Turn 8
More losses on the left combined with some psiloi losses in the village  breaks the center and gives the game to the Bretons 17 - 8

Reflections
A tough game where I broke two commands, but still lost. Wayne played it pretty well, concentrating contingents from several commands in the critical area to mitigate the vagaries of irregular pips. On the other side, his sacrificial raid around the wood kept my rightmost command out of the action, while allowing his opposite command to use its pips in the critical area left of the village.

We continued to experiment with writing the battle up as we went. Writing the text. taking and annotating the photos all works well, but putting all together on the IPad doesn't work well, due to problems with the Blogger software. Might let Wayne put it all together on his laptop next week, while I do photos and notes.

This week we used some new technology; a chair, for the high angle shots


Monday 10 June 2013

Wall to Wall Ordinariness

"Average Joe Breton is a-spinning in his grave."


Pre-PREAMBLE 

Despite the work front being indecently busy, Bob and I have maintained our weekly gaming routine, while it’s been the army painting and terrain building that came to a standstill.  The blog has also been unloved for far too long as well.

Additionally some eye sight issues kept me fearful of attempting to complete the massive Rhus and Viking painting task (in 6mm it’s a huge number of figures).  We had been waiting for the oft delayed Baccus Crusader ranges to become available as that was our next chosen era from which to add a few armies to the our respective stables but after another delay announcement I felt I needed something softer than the Rhus/Viking monster to tackle to keep the painting skills current. 

Despite their absence from the blog the Rhus have had numerous outings in their basic form with the Pecheneg ally.
  
The Rhus - a huge figure count - do exist.
None of these games made the headlines (blog) due to the work/time constraints, our failures to take photos and the eclectic nature of the opponents which, while providing great fun, didn’t really feel like reportable encounters even though I had a string of victories almost indecent in its length.


Next I spent quite a while playing with a morphed (read mis-represented) set of Kushan style figures used to represent the Jurchen, a four regular command army with a mixture of rCvS/O, iLhS, iKnF lead by rKnF generals.  Fighting mainly against steppe or otherwise generally mounted armies these produced a series of seat-of-the-pants, win or lose on the last roll of dice type of games which again failed to make the blog due to the above mentioned constraints. 

I agree that, as commented on by others, a regular four regular command army is the crack cocaine of ancient wargaming.  

I like the army so much that I’ve done the figure count and it will go with our next order to Baccus although there will be a bit of conversion work to make it from their ranges, but in the small scale the details of harness style and bowcase shape/location are usually irrelevant.

PREAMBLE

Like the Rhus, which only got painted into existence because I had wanted such an army for more than a decade and couldn’t face purchasing & painting that volume of lead in the 25mm we played in the old country, my new ‘soft’ painting project was another one I’d wanted to do for at least as long.  I had even started it in 25mm, using cast off GW LoTR Rhohirim figures bought super-cheap on the eBay equivalents, a year before departing for the Land of Smiles.
So, I’ve just got the Bretons ready to grace a table. Bretons, pure “O” ordinariness from start to finish.

Well, not quite, it’s list has six PsS and is the only foot other than HdO, and its allies can have iBdI, iKnF and iSpI.  But I always saw it as a test of generalship skill – no “S”*, no “QKs”* and for better or worse, no impetuosity. 

It was the pure ordinariness of it that was always its attraction.  We are a mad bunch at times, aren’t we??

TACTICS 

Having no QK’s and being (almost) all light horse and cavalry it’s reasonably resilient but never going to make holes in the opposing battle lines.  So it’s all about out-flanking, getting into the rear and flank locking enemy elements.  To do that you need to manoeuvre on one hand and hold the enemy in place on the other, for which the Lh and Cv would be assigned respectively.

The Cv are in danger from Kn and CvS but otherwise should be able to hold most other enemy if played conservatively and their line is maintained but to which a few gap fillers will be needed occasionally.  The Lh will have to be aware of the great Lh vs Lh lottery but otherwise should only be required to strike except when circumstances are favourable.

The big issue is going to be PiPs.  With only three commands and a lot of non-impetuous mounted filling out those commands they are going to have to stay in large (immobile) blocks or only a portion of each command is going to be directable.  That created the idea of having two of the commands structured so that you engaged with only about half of the command while the other part stood and watched from the sidelines until it was their turn.  I felt you couldn’t engage with all of the command because you are very soon it’s going to get a low PiP roll and get caught badly out of position.

Fight by groups in waves.
The third command is the annoy the enemy and run through gaps 16ME, general plus 10 LH elements command that we’ve developed in most of our steppe style armies**.  

Low aggression at 1 should allow for many home battles and using the terrain, especially hills and similar to provide ambush options will be very important.  But all must be done to prevent DGo on the flanks as that will damage the chances of the essential out-flanking and getting into the rear tactic that is so important to this army.

One last point, I maximised the peasant hordes (HdO of course) as they are the cheapest ME in existence and will fill a lot of table space and force the enemy to go really wide or spend significant time chewing their way through them.  The only other foot option is the 6 elements of PsS so the Hd may also double as terrain holders as there are no other choices if this is required.

So the final plan is:-
1)  Play at home and use non-difficult terrain to give combat advantage and ambush options.
2)  Fight in waves with commands engaging with only part of their troops at any given time.  The stationary portions act as march blockers and overlap threats.  Portions that have done their job can be abandoned to be annoying blockers as being non-impetuous they will just stand around.
3)  Keep the generals central and out of conflicts as they will be needed to control the second/third waves.
4)  Use the massed hordes in a stationary capacity to block table area, funnel enemy movement or to just take ages to die and hold up the enemy.
5)  With no QK options* avoid frontal clashes unless by cavalry with the purpose of stalling or holding the enemy in place while the light horse use rear attacks and hard-flank attacks to destroy the enemy from their wings inward.

PRE GAME

The army at least looks good.  The Rhus looked boring but these are more colourful and I am really happy with the visual effect I got and they feel ‘right’. 
There is colour, bulk, variation and even the bases worked with the new style experiment.

A few foot elements to play in the rough.


 Then the pre-game trash talk by email started and Bob got fixated on the photo mis-colouring that gave several of the horsemen a pink tinge despite there being not a drop of pink anywhere.  As I suddenly realised I was short the PsS elements I then did paint one figure in a pink tunic just to satisfy Bob.  (Thank goodness for a lead mountain which could produce 5 elements of suitable javelin armed psiloi).

Meet Bob Breton, only man with an excuse for a pink tunic.
Despite my confidence Bob just laughed at all my talking up the benefits of massed ordinariness.  He chose to avoid Kn based or steppe (S mounted) armies and bought his Burmese.  These Burmese have a long and distinguished history of beating up most of my armies.

There was one secret weapon in play, an ally option I had prepared in total secret and carefully never mentioned even once. 

GAME NIGHT DEBUT

The new models were so excited with their first outing they forgot the home advantage terrain plan and invaded Burma instead. 

The table quickly filled with unfavourable terrain as Bob put his efforts into blocking up both flanks, selecting one as his additional numbered side and using a placeable BuA for the other.  I did get a couple of favourable GHs on my side but the out-flanking options were effectively lost before a single element hit the table.

After deployment, which I did first having doubled the defenders dice, I made a late discovery - mounted can’t pass though Hd’s – doh, that’s a minor deployment error and something I’d missed in the tactics planning stage. 

The only positive was that I’d managed to get the totally unmentioned Frankish ally (half a dozen iKnF) in ambush behind a hill.  Bob was expecting my Vikings as allies only and didn’t realise I even had another ally option and the models were painted in total secret.  Even when I laid out only three commands they were wide enough for him to accept it was the total army (we rarely AP count).  Massed hordes sometimes has that effect especially as the army has quite a high element count anyway.

Bob’s posting has described the battle well (the spelling errors not withstanding) and include my own comments (with spelling issues too).  So I don’t have much to add.  Read his post "The Bretons Are Coming" for the games flow and some pictures.

The invasion and terrain layout was most unfavourable and ruined a good plan before we started.  The only option I saw was to concentrate troops from three command on Bob’s right (my left) where there was inferior and outnumbered Burmese troops facing our ordinariness and where my Cv could get QKs on half a dozen bow element.  It was the only option to punch through the line to get opportunities for our required rear attacks.  
 "No where to go but straight at the weakest point at the head of the big red arrow.  My superior "O-ness" against the inferior and out numbered Burmese in a line without backup options"

So I attempted it.  We were a bit unlucky in the combats and it didn’t come off.

The Franks were a good looking disappointment.  I may have released them a move too soon but as they needed a wheel in their charge I decided I needed the 5PiPs they had that bound rather than risk lower PiPs in a later bound.  To have them ‘shatter’ without inflicting a single casualty against BwI was so frustrating.  
The shame - that overlapped inferior Cv killed my "O" Cv general.

Of course these are Bob’s machine gun/longbow armed “elite” peasant levy inferior bowmen which have been the bane of my life for years.  They can gun down an entire Khmer elephant corps before contact, or anything else I tried to use against them.  They are so good I built my own entire bow army (Arabo-Aramenian) to emulate them from my side of the table.  In my hands bowmen just get run down – so I gave up on bows again – but still don’t have an answer as to why these Burmese iBwI are so damn good.

But next week we might be a bit less ambition is our travels and only go as far as the steppes or the Tarim Basin***. Our plans might get a full and genuine testing.

NOTES
* =  Well there are 6 PsS in the list and I use 5 of them but its so few as to be irrelevant.  For QKs maybe my mounted can in some cases deal this way to Ps and Bw.
** = During our past battles with steppe/pseudo steppe armies Bob and I have developed a Lh command of general, ten elements plus two baggage making a 16ME command.  These have the highest dishearten point (a disheartened Lh command is as good as dead) for minimum points and we have found that in commands any bigger some elements get unmoved, caught and killed anyway. 
*** = It's been suggested that Bob might play Juan-juan or CATs next week.