Saturday 25 August 2012

Pretty Tiered Umbrellas Aren’t Weapons of War


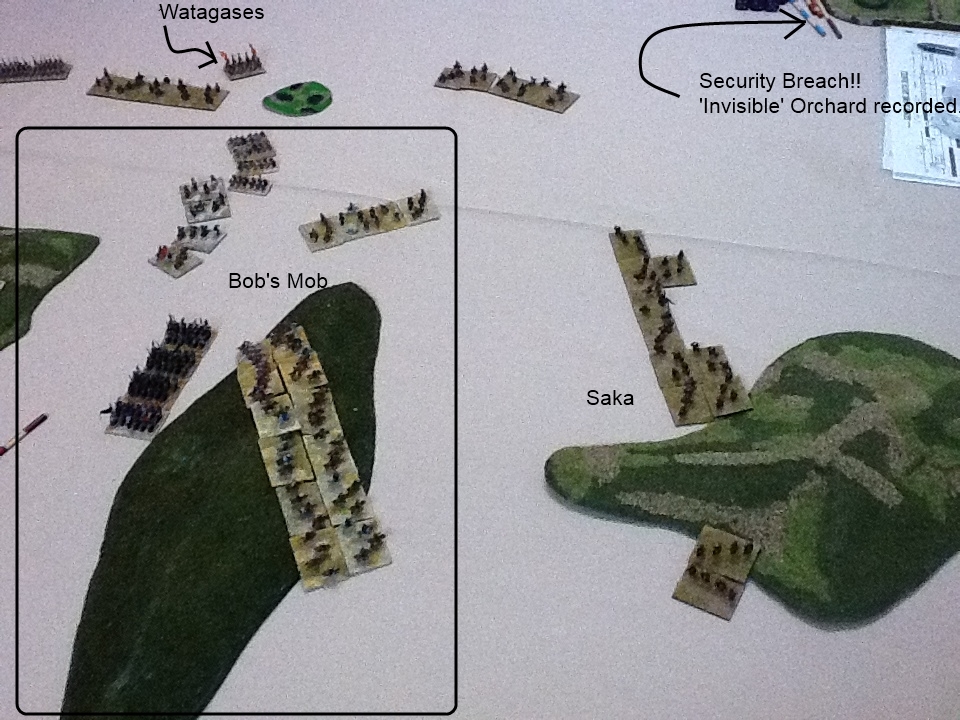
The Siamese pay a fleeting visit to Burma.


Bob’s Burmese, his original 6mm army (mine were Khmer), is really large in elements (not so in ME) and has a reputation for BwI machine-gunners (who needs BwS longbowmen) which have on more than a couple of occasions bought down an entire Khmer elephant line before contact.  It’s major weapons are the compulsory ElS and the swamping effects of masses of inferior foot.  It also gets enough upgrades to regular/’ordinary’ to be useful and against historical enemies can well outnumber everyone with cavalry (albeit mostly clumsy ‘inferior’) so can outflank them.  In SE Asia it’s the flexible, pick-in-mix army of choice.  Being irregular commands only adds to its sheer bulk.

On very rare occasions a game is just not meant to be, and last night’s was one of those.  

I attempted to engage Bob’s Burmese with my Siamese (Ayuthaya Kingdom) after he issued the challenge last week and below you can follow the list of disasters, both natural and self inflicted to see why I shouldn’t have bothered turning up.

#1)
SE Asian armies all have elephants as prime impact troops.  To take non-ElS up against ElS is suicide (done that several time with the Khmer too) so I needed a ElS version of the Siamese plus the BdF to stand any chance of cutting through the masses of foot.  The only point of difference when you are going to be noticeably smaller than the enemy is a regular command structure and as many regular troops as possible.  Regular ElS generals are super-expensive!!  And then I like four commands. 

The new (haven’t used the Siamese for a while, since the “Elephant Too Far” battle) very experimental Order of Battle was a compromise in all directions and a daft idea.  Four commands, only two regular, plus one an ally, at 21 ½ ME the CinC was all regular troops plus psiloi and El), the regular sub-general at 21ME (iBdF), and two at 12ME, one a sub-general that could ambush in its entirerity, and an ally.  All commands too small and fragile (and some elephants downgraded to ‘ordinary’) and I knew I’d need to use terrain to make this work by keeping his mounted at bay and narrowing the frontage.

There will be a ritual burning of the OoB today.  This list was self-inflicted stupidity.

#2)
Even with lower aggression I invade.  The required terrain selection quantities are lowered.
Bob minimises his terrain selection numbers further reducing the terrain count (and I feared Yuan ally approaching but he later mentioned his army date excludes them).

#3)
Terrain falls badly.  Only one piece on my side and it’s a long wooded hill in my left flank.  Despite it being blatantly obvious I decide to ambush an entire command from here.

#4)
I decisively out dice Bob on deployment.  As invader I now deploy first.  With no options on a basically flat open field ALL surprise is lost.

#5)
I’d totally forgotten the Burmese have TF and Bob’s uses it regularly.  My impetuous iBdF are left aimed directly at the TF manned by iBwI because I’d deployed first.  There is an inexplicable gap in the TF’s centre with an ArtI in place.

Also Bob has significant cavalry, to my nil, and they are on his left flank (my right) and have a unchallenged path into the rear of my biggest command or my army as a whole.

I tell you "There are twice as many Burmese as there are Siamese".  And my position is rubbish.
I wish I had someone other than myself to blame.
#6)
I allocate coloured dice to each command and use them as irregular totally forgetting two were regular.  In doing so I transposed a 6 with a 1.  Doh! 

#7)
Death by stupidity - and a 1-6 roll!!
Having bought the maximum two ArtI myself I had placed a lone iBdF with one to meet the compulsory ‘deploy in groups’ rule with him going impetuously back to the rest of the command in the first couple of moves.  By coincidence it ends up facing the Burmese ArtI without the TF.

I double move it to get close as possible and to take a cheap shot in a later bound.  No problem, ArtI range is 240p.  Not so says Bob, its 320p and you’re in range (of course he’s correct, but who remembers these things when there’s not been a ArtI fired in anger for a year or two).

So it’s bound one and we have an unintended engagement already.  The blade DIES on a 1-6!!

#8)
Having now realised I have two regular commands to use by allocation I roll my second bounds PiPs as 1-1-1-2 and the 2 belongs to the command entirely in ambush on the flank Bob’s is avoiding due to a scary looking wooded hill.

So that’s basically decision made, the massed iBdF, comprising the biggest command (but only 21ME!!) is going impetuously into the bow defended TF, on an angle.  Having seen the Rus spear do a similar thing I know it’s a slow but ultimately possible task.  If it is achieved it would seriously damage the Burmese and cut them in half.

#9)
That's as close as we got.
The blades were mostly double ranked and a couple got to combat (no wins but all recoils not losses) but the bows did the damage (my dice were rubbish – by this point I commented I’d thrown more 1s that all other numbers combined!!) – the command disheartened, lost its impetuous status and stood there to be broken by another bound of bowfire.

I had lost my biggest command without inflicting a single casualty on Bob.  Very clearly game OVER – in theory anyway.

The story unfolds further...
At this point Bob goes conservative to see if he can win without taking any casualties at all. 

The soon-to-break command would leave a big hole - desperate measures under way.
I had managed to get the CinC with his rBdF guards (free PiPs) over to the right to cover the incoming cavalry with help from the (now broken) sub general and his two guards.  It neutralised that threat for the length of the game but was always only going to be a holding pattern only.
Having halted the Burmese cavalry the CinC and elephants are too broken up and surrounded and are about to get swamped and be added to the casualties that break army.
Ambushers come off the (sparsely) wooded hill. 
On my left I released the ambush so it could cover the open space and co-ordinate with the ally command (remember both are just 12ME commands – fragile) to try and hassle Bob’s single (CinC’s) command on this side. 

I did make a fight of it on the left, disheartening the opposing command taking out a few elements and 3 ElS using my ElO and BdF.  However Bob’s few rBdF were close enough and quick enough to fill gaps and his CinC got actively involved and we ran out of punch.

Ambushing the Ambushers.
A funny moment occurred when my ambushing command, having appeared and charged across the open ground was itself ambushed from its outside by a group of AxO from behind the crest of a RH that was on the table edge.  
Luckily we were far enough away that we had time to align a couple of our BdF to deal with them.

What was going to be our shortest game ever did eventually play out to normal length and it was still great fun (I did laugh a lot – so as not to cry?!?) as usual but the result was always a foregone conclusion.  

Burmese elephant buttocks - all but the CinC (right)
failed to survive the battle. 
Once the big command was destroyed I was just plugging gaps, getting broken up and awaiting the bound where low PiPs would see me surrounded and squashed.  It took longer than expected before it happened and in the meantime I did some damage but eventually it occurred.  

The result at 5-20 was respectable in the end considering 0-25 after 3 bounds was almost a certainty.

My Siamese were originally morphed out of the Khmer but I added a Thai elephant corps of 6mm conversions where I added polearms and weapon racks to the elephants plus the correctly shaped and coloured multi-tiered command umbrellas. 

Modifying 6mm isn’t easy but the perfectionist in me said that you can’t use Khmer elephants for Thai when they are clearly so visibly different.  I made a few for Bob as well to use in his general elements as the research show that Burmese and Thai generals were almost identical.  Before any re-published Book 3 arrives I hope we can revisit the Burmese list with some improvements on the details. 


But as I discovered, having correctly attired elements adds absolutely nothing to their fighting ability.  Nor to the commanders rational thought processes!!  Back to the drawing board today.

Yes where have all the elephants gone.

After five games in the Parthian civil war saga, we felt it was about time we wrapped it up, and played with something else, so we agreed on one final battle to settle things, with the loser going to into exile in Dubai.

So Watagases marched from the East with his bastardized Indo Parthians, and Bobarsaces summoned the renowned (or not) elephant slayers from Armenia, and the slightly less renowned cataphract slayers from Sarmatia. Although the elephants would still be a problem, I was confident that with the right ally they could be contained.

I tried to keep the battlefield fairly open to allow an opportunity to outflank the pachyderms and to avoid being forced into fighting them head on. The terrain of note was a BUA on my left, several gentle hiills spread throughout my deployment area, and small marsh in the center of Waynes deployment area. I deployed the Armenians in a long line from the BUA on the left along the hill nearest it, with the CinC and main cataphract force behind. The right was held by another command with some cataphracts and the bulk of the light horse. The Sarmations would play a wait and see game as a delayed command. The idea was that putting the Armenians in line out front would mean that it'd be hard for Wayne to avoid activating them if they were unreliable, that their light troops could contest both the BUA and the the little marsh, and that wherever the elephants were, there'd be some auxillia nearby to mask them.

My opening set up

Wayne's deployment surprised me a little as I didn't expect him to rest his catapract command's flank quite so closely on the BUA when I was likely to have better terrain troops. The absence of elephants was also a surprise, but without anywhere obvious to hide them, I assumed they were flank marching, and could safely be ignored as Wayne's flank marches only ever arrive when they've been pushed back by one of mine.

Initially I thought I'd try to break Wayne's small Saka ally first, but when that rode out far to my right, and he moved a whole lot of other light horse over to support it, I decided not to bother, and instead to set things up for the cataphract fight by occupying the BUA on the left, and the small central marsh that was to the right of where the main action would be. This meant sending most of the light horse from the CinC's command and the Armenians over to the right between the Saka and the reinforcements that were moving towards them, and sending a column of Armenian auxillia towards the small marsh to support the horse archers. The action in this salient essentially became the battle with both of us sending in more troops.  On the right side of the salient I had horse archers from three commands, but one command had poor pips, and the Armenians had other things to do, so Wayne was able to keep the initiative in the light horse fight, and inflict a large number of casualties.
An Armenian sneaks into the marsh while the battle rages on either side of their column
The salient fully formed. My heavies coming up in support

In the center of the salient I had more success getting one Armenian into the marsh, and forcing Wayne to throw Watagases himself into the fray, and also send in his remaining light horse reserves into the teeth of my advancing cataphracts. Watagases decided to go for glory and rode down an auxillia in the open, totally neglecting the one behind his flank. Needless to say the next bound he found himself flanked by it, attacked in front by another cataphract,  his horse archer flank support stripped off, and more cataphracts from my C in C's command threatening to get behind him. Indeed Bobarsaces attempt to close and finish things mano a mano was only thwarted by a light horse who needed to win by plus four on the dice to live, and did so twice in a row. Nevertheless, when we came to the climactic roll, I only needed even dice to kill Watagases. Unfortunately, he out rolled me decisively, not only not dying, but pushing the attackers back, allowing him to extricate himself from the predicament in the next bound with a smart tactical advance to the rear.

Surely this is the end for Watagases
This left many of my elements facing the hole where he'd previously been, and the rest of Wayne's army behind them. Their disarrayed state led to further losses, and combined with the drubbing I was getting in the light horse battle on the right, led to the loss of the army. Both Wayne's flank march and my Sarmations turned up before the final bell, but too late to make any difference.

While I did have a good chance to kill the opposing C in C, that was mostly down to Wayne.s mistake  rather than my great generalship. My battleplan has several shortcommings, most notably giving the Armenians way to much to do (take the BUA, take the marsh, and take part in the light horse battle), pushing a salient out between two light horse forces was always going to be tricky, and starting the Sarmations off table was a dumb idea, bourne mainly out of recent habit and good luck in the having them arrive in a timely manner. Oh and on the left, I screwed up the attack on the BUA my hanging my flank in the open allowing his cavalry to intervene, and the gap between the BUA and the hill was mainly held with wishful thinking rather than any troop elements.

So congratulations to Watagases for  a remarkable comeback, squaring the series, and as the previous incumbent reclaiming the throne. He's survived three successive defeats in battle, and assassination attempts by egg mayo sandwich, elephant buttocks, and good only fashioned hard flanking. Clearly he is beloved of the Gods, and thus the rightful Great King. I shall repair to Dubai and write my memoirs.

Wednesday 22 August 2012

Where, Oh Where, Have The Elephants Gone?? (Parthian Civil War Part Six)


Bobarsaces did indeed survive*.  Just when I arrived at Ctesiphon to be re-crowned, who should show up, in full preening attire and equally vainly attended.  The usurper – again.  Some dogs just need to be dismembered to be sure they are indeed dead*.

So on the eve of what is to be the final battle (as I’ve issued no quarter orders and will execute all above brigade level if his head isn’t on a spike set before me by the end of tomorrow), we are encamped in position on the open ground with our right flank resting on a BuA (supplying the usual urban delights for the nights feasts and entertainment) and our encampment stretches out over the plains into the distance.  Off in the horizon is a minor orchard, that may be so significant that I’ve ordered it’s not to be recorded by any of my scribes or artists (read – it’s not in any photos).  More of the ‘invisible’ orchard later.

The enemy, lead by the usurper Bobarsaces the Unspellable, the vain-glory lackey of big business date traders, are skulking in the hills being unable the face the glory of a real King of Kings in the light of day out on the open plains that are Parthia. 

The sun has risen and I ride forth to smite the enemy.  On the open plain, except for two micro-march areas, I stand with my wall-of-steel cataphracts stretching from my right all the way to the BuA (source of last night’s female delights) commanded by myself and a loyal general Watshisnameces.  Mucking around conspicuously** at the rear of the BuA are a bunch of Watshisnameces’ Indian foot. 

The cataphracts have their screen of horse archers plus I have more looking to our left flank plus a bunch of these Indian useless levies standing back by the baggage.  The Saka I hired this month are out forward and centre just in case they get ideas not to honour their contract***.  The other loyal general, Obsurarces, was sent early this morning away around the right flank to come on upcountry and roll over the hills from the outside. 

Before us, are four large gentle hills with five valleys where the enemy CinC lurks a long way behind a large expanse of Armenian allies.  On the right (his left) was one of his cronies leading a small but similar command.  Something was definitely missing although the minimums had all been met.  Given the rough behind our BuA I didn’t expect Bob to flank march on that flank so expected our off table command to be quite safe until it arrived.  Actually given the open enemy free expanse it should advance onto, including access to the enemy baggage I was quite looking forward to its arrival.  Bob was assuming it contained the missing elephants.  I anticipated Bob’s missing command would flank march on from our left past the ‘invisible’ orchard.
Usurper to the left, genuine King of Kings to the right
Cowardly leaders to the rear.
Impenetrable Wall-of-Steel (& screen) protects a micro-marsh.
 Despite invading, we deployed first and should move first. 

I, insignificant scribe of the great unrelenting fighter, the King of Kings, Watagases I, humbly known as Unnamedarce have been instructed to finish this tale of great martial and valiant feats of arms. 

As before we opened with great starting PiPs including a six for the allied Saka and a 5 for the flank march (which needs a 6).  Over the first four turns the flank march rolled four 5s in a row for PiPs and on the 5th attempt, needing a 5 or 6, you can guess how that went.  

With 6 PiPs the Saka went mad and ran off right around the outside of the enemy so that they threatened to immediately be in the rear of the outside command and in dangerous numbers.  Our glorious CinC had to send some horse archers after them to be sure our army wasn’t cut into two pieces.  The wall of steel just juggled its position slightly and on the right the idiot Indian foot, who’d messed up the ambush tried to get themselves back into order.  The opposing Armenians didn’t scare us, at worst it would be a stalemate but to be sure to win on that flank we awaited our flank march to arrive as they would arrive into the exposed enemy wing.  In the meantime this side would just do the minimum to keep out flank guarded, no aggressive action was intended.

Saka have gone long and wide (front right) and in response the enemy withdraw unto the hill.
At this point, barring the enemy’s missing command causing havoc, we had both enemy wings under pressure (I verbally slipped up at one point and indicated where our flank march was but Bob had already guessed, I think) and a continuous and strong front line threatening 80% of the enemy’s frontage.  The point of weakness, which I planned to use as a trap, was between the overly mobile Saka and the left end of the CinC’s command.  He had sent some LhF to the left to at least give a sense that we wanted the gap covered.

Apart from two micro-marches**** we were on a huge expanse of open terrain (with GHs only whose only effect is uphill combat factors, all other terrain touching table edges in the table corners) and on the left wing it felt like a open plain light horse duel, with lots of moment, circling, stopping and watching  but little closing to combat.  They was no actually fighting intended unless you had a clear advantage – and an exit option. 

To gain some advantage Bob sent LhF from three commands into the gap between my CinC command and the Saka ally along with some AxO aimed at a micro-march my side of mid table.  A column of cataphracts came behind to add some weight if needed.  Initially I didn’t feel threatened as the advance was containable and was drawing resources and future PiPs away from my awaited flank march.  Unfortunately an element of AxO got into the micro-march, from which it would be very hard for LhF to evict it, and caused some annoying threats to element flanks.  I countered by TZing it, and luckily moved my CinC into the area as heavy support but we suffered a time of lower PiPs and lost the local initiative. 
Bob pushes into the faux weak spot faster than expected.
Watagases himself comes to add some heavy support.
As Bob had started a more general advance that would use his advanced salient as a flanking benefit I decided I needed to deal with it before the flank march looked like arriving.  I intended to cut off the exposed salient with a pincer movement using two commands but again ran short on PiPs at an inopportune time. 
Ready to attempt the pincer attack.
The great warrior King of Kings, Watagases was leading from the front and got himself exposed and surrounded.
Enemy to the left of me, enemy to the right.
Despite the support this doesn’t look good.
 In an effort to extract him alive we tried both sacrificing LhF elements and removing Bob’s straight ahead moves so he needed 2PiPs per move to make contact with KnX and/or AxO.  At the point where the martial expert Watagases was hard flanked and fighting cataphracts, Bobarsaces sensing a decisive moment approaching, moved himself quite close to the action (and for the first point in the battle wasn’t the element in his command [or the army either by that point] that was the closest to the table edge) ready to take the glory earned by his minions.  And of course our desperate efforts didn’t work.

We had to resort to Plan ‘B’ *****.

Plan ‘B’ – Dicing your way out of trouble!!
At this moment our flank march announced it arrival, to support our troops who had been filling in time skirmishing and probing the Armenians in and around the BuA.  Immediately after Bob’s missing command turns up as a delayed command, so arrives on table before us.  It’s the Sarmatians (he had two allies!), the anti-cataphract all iKnF version and he chooses to aim them at our wall-of-steel (rather than try and support the mid-table battle of the salient) and run a risk from charging across the face of our flank march.  Maybe he expected the missing elephants to slow down our progress across the table due to a slower speed.

At this point knowing where everything now was located and where our flanks would or won’t be exposed, we ordered a general advance.  Bob had been taking a few casualties over his three on table commands and some decisive combat action could push any of them to dishearten soon and with our flank march now going to be in the enemy rear and into their baggage we needed the frontal contact for both damage and to control his options.

Our flank march came on, consisting of all light horse (both F and O) plus a KnX general.  No elephants in sight!!  With reasonable PiPs it split into two groups of light horse, the fast getting into baggage strike range and the ordinary marching over the first hill while the slow general was abandoned to his own devices.
Arrival of both the Sarmatians and the flank march plus a general advance on the main battleline.

As Bob had spent the game dealing with the potential of elephants arriving from somewhere, and had played with the thought of elephants repeating their previous carnage of his cataphract line*, it seemed only fair to now put him out of his misery. 


We released the news that the elephants were in fact picking dates in the ‘invisible’ orchard on the very left corner of the table.  So out they came, in column, but with half a table distance to cover to reach the battle they were never going to arrive in time. 
Date laden elephants wander out of the orchard.  Contribution - Nil.


Having extracted a much relieved****** Watagases we were in a position of having the upper hand in several positions across the table and used out superior numbers, troop quality (KnX on LhF) and dice rolling skills to wear down and break commands and thus the army. 

Final Positions - Bob's left flank.  Armenians broken, Sarmatians taking attacks in the flank.


Final positions - the Salient, Bob's right.  Commands and army broken and surrounded.
Bobarsaces himself, being a long long way from a table edge (almost in the dead centre of the table) didn’t escape this time and was captured [imagine the likely possible event the available LhF in the rear of a fleeing KnX].  In a moment of mercy he wasn’t executed but branded, castrated and exiled to a suitable neighbouring city-state.*******. 

A FINAL OBSERVATION
Watagases is yet to return to active leadership due to needing to clean-up outer and inner garments after so much personal exertions and danger.******  Unlike last week where the potential loss of the CinC was unintentional, this week I did it on purpose after much deliberation, in fact it was the first thing I considered that bound and yet the last action I took.  It wasn’t the move that was the problem it was the expected retaliations that may have been available to Bob.  Uncertainty abounded, yet I was in a strong position if the flank march came on and maybe should have waited for it to arrive.  In the end I pushed the CinC into a very dangerous situation and in the end needed to rely on better dice than Bob to get out him again. 

Putting the CinC is so much danger, was it worth it??  In hindsight, despite it coming off and the CinC surviving the answer is a resounding no.  It was a step too far into danger and the relatively high odds of it going bad on Bob’s subsequent bound could so easily have made it a disaster. 

But this is a rare occasion where doing a daft thing didn’t become a tale of woe for me.  Anyway I add the crown of Parthia to that of the Kush*.  A genuine King of Kings, so what is next??
  
* = See previous instalments.
** = A ambush which was so badly set that it was deployed in conflict with the rules, so was declared on bound one when the error was noted and thus placed on table and the surprise lost.  I had tried to ambush from an unfortified BuA.
*** = Bob can’t help but reactivate them if they become unreliable allies if he mounts any attack across the table centre.
**** = marches that are almost the smallest possible dimensions allowed, approx a 2x1 ½ base width oval, which I designed to be placed early in the terrain layout process to block the opponent’s choices/chances of placing other annoying terrain in the area.  Used especially by open terrain (all mounted) armies to control strong terrain based armies getting overly favourable terrain.  Sometimes they are very successful in their job but mostly disappointing due to the random factors involved.  A mildly gamey ploy to get some advantage from the terrain rules system that I think is both balanced and robust.
***** = Plan ‘B’, for every army I own and every battle I fight is simple – “if all else fails, dice your way out of trouble”.  Doesn’t have a high success rate though.
****** = The offending scribe who suggests the great leader was anything other than confident and capable in all military activities has since been painfully executed.
******* = In Thailand all losers of military endeavours (coups) gets exiled to Dubai.  Those with local political knowledge will understand.
(right) A slightly startled Bob[arsaces] contemplates the exile to Dubai while (left) the victor looks forward to reinstated pleasures.
[Also known as "how does the front camera om this iPad work??]
You will now have noticed I've worked out a lot about how to mark-up the photos now.  A frustrating time but perseverance has paid off, hence it's over use.  Now to work out where the colour changer is.

Wednesday 15 August 2012

Grrrrr... Again

Well after the minor setback at Hatra, rumors emerged that Watagases was again raising an army to invade Parthia, so we gathered our army, summoned our allies and waited... and waited....   and waited.... and waited. In all the battle was delayed three times by tied aggression rolls, but eventually it emerged that Watagases had made his way across to the Indian border and was attacking from there with support from the local nobles. We moved swiftly to meet him. (I was the attacker).

Now it seems Watagases is the dog that will not die, and I wanted to kill or capture him and bring this saga to an end. Since he generally hangs out on the fringes of the battle, it seemed the only way to stop him legging it when things went pear shaped, would be to surround him with a flank march. To help this plan succeed, I selected a delayed battle stratagem to increase the chance of the flank march arriving, and an exaggerated army size stratagem to make the forces initially deployed look beefier, and to force Wayne to be more careful about attacking them.

When the terrain went down, there was a large marsh and scrubby area dividing the battlefield pretty much in two, and it wasn't at all clear which side Watagases would be skulking on. To maximize the chance of having something to clobber him with, I thus not only flank marched on the left, but also delayed my Sarmation ally, so that they could enter on whichever side of the marsh Watagases was.

Now up until this point Wayne hadn't informed me that he was using the Indo Parthian version of the list, so seeing two elements of elephants go down was a bit of a surprise, and threw a considerable spanner into the works of my plan. Since I'd picked an all mounted army, I had nothing at all to counter elephants with, so the only viable tactic seemed to be to run away from them, and try winning the battle elsewhere. I deployed pretty much as I'd planned, but with the intention of immediately running my C in C and his accompanying cataphracts off to the right away from the elephants. I placed a single real cataphract and two fake ones further to my left, in the hope that they might be enough of a target to attract the elephants, and stop them chasing my C in C.

Now most people complain that their flank marches never arrive: I have the opposite problem that mine always seem to arrive too early, thus negating the fear uncertainty and doubt that they're supposed to cause. This battle was no exception, with both my flank march and delayed command turning up on the first attempt. With Wayne apparently having no reserves behind his elephants, there seemed a good chance that a flying column of flank marching light horse could get into their rear before they stomped all over my cataphracts, so I abandoned the plan to run away with them so that they could apply some frontal pressure while the flank march attacked from behind.

On the next turn, I was a little dismayed to discover the ambush behind the hill obstructing the advance of my flank march, as it meant my C in C and cataphracts would have to face the elephants alone. With things looking grim, a ray of hope appeared when Wayne used his C in Cs pip to advance his elephants forward, then inexplicably didn't use his remaining pip to provide a flank guard for them. From my seated position I couldn't be absolutely sure that  my element was behind his flank, but I sure as hell wasn't going to give the game away by jumping up and looking. So I just sat there and tried to look bored. As it turned out I was able to turn the elephant so that Watagases would be trampled if it lost, which I thought would be fitting end to the saga, and poetic justice. With two overlaps and no recoil, the factors were two each. Yes!!!, I thought when my dice stopped showing a six, there is a God. A few moments when Wayne's roll also came up a six, I realized that not only is there a God, but he's a bastard and hates me.

After this, the battle was a bit of an uphill struggle. On the right the Sarmatians charged into the mass of Parthian cataphracts, but were ultimately disappointing and quickly broken. In theory counting the Kn(X) as I should make them effective, but in practice the compulsory follow up  gives the advantage to the cataphracts. Some honor was salvaged when my flank march broke their opponents, and the Saka ally general (Cv(S)) strayed a little too close to a cataphract and got himself quick killed, but it wasn't enough to break Wayne's army, and his elephants quickly crunched enough of my army to defeat it. Luckily Bobarsaces himself had managed to maneuver himself into a position near the table edge where he was able to hand the crown to a nearby courtier, and quietly slip away.

And as for the allegations of being an "all round bad guy" we absolutely deny any rumors that our armor has elasticated sides.


Tuesday 14 August 2012

We Came, We Cheated, Did We Win??* (Parthian Civil War Part 5)


If at first you can’t win, then try different tactics, if that doesn’t work – CHEAT!!  After all, all’s fair in love# and war(games)’ – just don’t lose or get caught.

Not having a good record over this series of games, I definitely still needed an edge.  We had both spent time and effort in trying to find that small advantage that would break the KnX and LhF world that is Parthia, in my case without much success.  So it was time to bend the rules of engagement to breaking point (yes, it was probably cheating) and bring out the big guns.

There is nothing the KnX (and LhF) hate more than Elephants.  So I called on my distant cousins, the Suren from the eastern most provinces and bought an Indo-Parthian army, on the basis that  a) I was desperate  b) it’s in the same list and  c) it had elephants!!

Bob of course thought it was cheating**.  And it damn nearly backfired on me - literally!!  ***

The plan was going to be simple.  The CinC with attached elephants was going to be aimed at the opposing CinC and run him down along with his local KnX support.  We would take a smallish group of KnX along to sweep away enemy LhF and lock up in combat enemy KnX while the elephants did their work.  On the basis that the bulk of the enemy KnX would stay with their CinC to use his free PiP to help their manoeuvre issues, the terrain was to be set to give predictability the most likely place for the enemy CinC to deploy and thus for the elephant corps to target.  Additionally we would like the terrain to provide locations to launch ambushes from.  Such ambushes would supplement the remaining three commands tasks of just harassing, annoying and blocking the enemy while the heavies did their job. 

So the elephants were on a seek and destroy mission and the rest was to be just a side show.

As we all know plans never survive initial contact with the enemy.  The main thrust concept worked but the sideshow(s) turned far too serious for my liking.

However, at the risk of spoiling the story, you should know that Bobarsarces (the unspellable) did indeed spend the entire game running around in circles, hiding behind his troops and trying to look inconspicuous in the scrubby ground (mainly juniper bushes) while avoiding the elephant corps that was forever closing in on him.  Apart from one moment, where the elephants were in serious danger of trampling the wrong CinC (see below), this idea was a trumpeting success.

As to the rest of the battle, well that’s a story in itself.

Opening positions.  Bob on the left (figures on the table edge behind the scrub are baggage  not fighting troops) and  Wayne on the right.
Super sized command is top left.
A marsh was front and centre with a couple of PsO to protect it and some iPkF were on its left to anchor the bulk of our KnXs’ flank on the marsh as they lined up to the left towards the orchard on the left wing that ran up to the centre line.  In the orchard were eight HdO in ambush.  Well back on the left were the Saka all LhF ally command, positioned to cover the KnX, orchard and any flank march (and be activated by such in they proved unreliable).  The CinC was right of the marsh with the heavies deployed with a screen of a few LhF and the last command of Light Horse on the right to cover the heavies flank and screen any flank march attempted on that wing.

On the right touching the centre line was a long/lateral gentle hill.  The right command placed its LhO (plus a couple of LhF) forward in ambush behind this hill either to surprise any enemy LhF outflanking manoeuvre or as a reserve against a flank march but I left the visible numbers to look like our standard steppe LhF size command (General+10Lh+2Bg=16ME****) when in fact it was the full 24ME arrangement.

I was somewhat surprised to find I was facing only two commands.  On my left, as I viewed it, deployed on/in front of gentle hill was a command of mostly LhF plus a few KnX including the general in the 22-24ME range (I counted it quickly at 22ME but assumed they were a couple more elements lurking out of sight).  As it faced my massed KnX and supporting Allies I would have the upper hand in a straight up fight.  I was also deployed to account for a flank march on this wing and as Bob clearly had some devious plan in action and there wasn’t much for him to hide entire commands behind terrain wise it would appear that I was in good shape here.  So I was comfortable on that wing.

On the right (Bob’s left) was the huge 36ME CinC command (I counted it), Bobarsaces himself, with the mass of KnX and the rest in LhF.  Interesting I thought, against the usual trend with Parthians, he’s taken way more that the minimal KnX.  In the post action debrief Bob said he expected the sheer size of it to put me off advancing to engage it as it would be an almost impossible task to break it in a alike troop type engagement.  Unfortunately, I had a different take on things.  I had two commands facing it, with elephants aimed at the less manoeuvrable KnX, my KnX aimed at juicy LhF targets and a local superiority in LhF anyway.  Additionally I still had a potential incoming flank march to worry about on that wing and while the LhO ambush should blunt it if it arrived, I didn’t intend getting bogged down by having it on my flank.  So the orders were passed quickly – we are all going forward!!
The heavies (from l to r) Cataphracts, elephant, CinC Cataphract, elephant and the LhF screen.
Opening PiP dice were very good.  In fact, one interesting feature of this game was the good PiP dice on both sides which allowed plans and counter-plans to be quite freely available.  Except, of course, on the odd occasion where a sudden shortage of PiPs would cause the most heartache.  More of that later.

So we set off forward on the right wing as fast as we could.  (On the left, in line with the side show only plan and the potential flank march, we held our position).  The right hand command nearly gave away the ambushes position because in passing through them, I had to do some quick math and found that the last element wasn’t going to clear.  I though Bob might have guessed when a single element dropped off the column before going over the hill but apparently not.
We are coming to get you - and you've nowhere to hide.
In keeping with the great PiP supply in the game Bob’s opening PiPs revealed both a delayed Ally Command (the cataphract hunting, auto-piloted KnF Samaritans) who entered opposite my massed cataphracts and an impending flank march on my right, Bob’s left, where they’d enter behind my advancing elephant heavy brigade.  It confirmed my decision to charge ahead into Bobarsaces and his super-sized command, leaving some of the right hand command LhF, plus their ambush, to hold up the flank march.  At this point I could see three of the four commands and the quick and nasty math said the imminent flank marching force wasn’t going to be too big or difficult and given his overload on KnX already on the table it was probably going to be all LhF, perfect game for my LhO. 

So in addition to getting maximum distance with the Samaritans, using their ample PiPs, Bob also used the high numbers to manoeuvre his cataphracts out of the direct line of the rampaging elephants and had Bobarsaces himself scurry (that is the right word!!) around even further behind the cataphracts for additional protection.  Certainly not encouraging actions from the imitation King of Kings (especially when compared to the real King of Kings who was at that point in full flight*****, charging down upon his enemy while flanked by trumpeting elephants, his nobles and assorted horse archers) and not likely to encourage his troops to great achievements.

Plentiful PiPs saw our charge continue, and the other commands prepare to meet the enemy.  If we could smash the over-sized command, and both the matchups as well as numbers were in our favour, then the rest would be easy.  So what went wrong??

Well, the really large enemy command evaporated before our eyes – literally!!  I was suckered by a exaggerated command stratagem which besides being annoying and making the job at hand harder caused a sudden realisation that the flank marching command was going be of a serious size and composition after all.
Where have all the bad guys gone??
The battle now split up into three distinct fights, which were separated by enough distance to be basically mutually independent of each other and expected to be long enough before reaching an outcome to probably not then be able to interfere elsewhere.  This was no longer a main event with side-shows but three serious actions where the winner needed two out of three to come out on top.
Mid game - three distinct and separate engagements.
Top - Flank march trying to come along the hill.
Centre Left - Elephant corps chasing cataphracts
(CinC on CinC action)
Bottom - KnF on KnX seat-of-the pants drama.  

On the right wing the flank march came on with a group of KnX, including general, and groups of LhF on either side but they were surprised by the elements of light horse in the ambush that they sprung and their formation wasn’t ideal to meet it.  With a wider frontage, a large part of the command having already turned to face the flank, sufficient PiPs and being willing to sacrifice the odd light horse to hold up the KnX my command prevented the enemy command from advancing more than two moves onto the table.  By the games end we had broken, but the enemy was suitably damaged and had been kept out of reach of our troops rear so we had done the job required.
The Action starts on the right wing and the ambush behind the hill is sprung.

On the left wing, the Samaritans, never short of PiPs closed down on my cataphracts and while we had gotten organised on a wider frontage, we had to receive the charge and risk the ‘inferior’ effects of being cataphracts fighting other knights.  
Here they come, steady, ready .........
When we were hit we had overlaps on both ends of the line but only the general free to plug gaps.  The impact only punched one hole through our line and it was plugged.  Thereafter we used our supporting ally to protect our flank, made overlaps and played on their ‘fast’ effects in combat.
IMPACT!!
The fight goes on and .......


After a few bounds we routed the Samaritans.  
...... there they go again.  Samaritans have gone leaving the relieved cataphract line intact.
We had launched a few hordes out of the orchard to tie up the enemy’s Parthian command on that flank in support of our Saka Allies who were hard pressed by enemy cataphracts.  In protecting our cataphracts flank the Saka had been damaged and they broke when their general was run down by an enemy KnX behind our line.  Luckily the Saka are the smallest command, and even with two commands broken I was still in the game at this late stage.  Bob had the Samaritans shattered and a disheartened command at this point.

As you may have guessed it was the CinC on CinC commands action in the centre near Bob’s rear table edge that was to be the decider.

With his command having shrunk to a more manageable size, he split some LhF off to head to the table edge in support of the flank marched command.  While they mostly survived they never reached the edge nor provided any support having got into a cat and mouse game, in an area neither of us gave PiPs to, so stayed mostly stationary.
The ex-oversize command has been split and the elephant corp are trying to corner the enemy cataphracts against the scrub.  But danger is about to arrive from an unexpected quarter.
The rest of the LHF ran across the table behind their cataphracts.  Bobarsaces continued his scurrying and was now past and behind his own cataphracts and was by now trying to look like a juniper bush in the scrubby ground.  Bravery was not on his list of attributes!!

The command was split so that it was no longer directly in front of my elephants and cataphracts and I’d have to have even more than the ample PiPs so far to realign myself.  We had realigned the elephants and my CinC onto the right heading but one elephant was no longer directly aimed at anything.  Without fail, this was the point where the PiPs went bad – I had just one (plus the CinC’s free).  The elephant’s right flank was open and I measured the LhF cover for it (illegally the first time as Bob pointed out, I’d used a 2PiP move) but then having got the spot marked, I changed my mind!!  I did something else to force a combat.  The reasoning was that even with a hard overlap from the only enemy in range (LhF) the danger was low and the next bound we see me demolish anything in the area with elephants and cataphracts, so I reasoned Bob wouldn’t risk it. 

BIG mistake!!  What I hadn’t realised was that with a few mm to spare the enemy LhF could get the front edge combat on my flank edge, plus an overlap on each side thus turning the elephant to face putting its rear onto my CinC’s flank so another disadvantage for no recoil.  I have an adage for the effect of knock on element destruction****** but basically the enemy LhF have a quick-kill on the elephant and it’s death would automatically kill my CinC as well – and the combat factors were +2 vs +2!!. 
We didn't see that coming!!
So here we are, mid battle and I have a 50/50 chance of being trampled to death by my own secret weapon.

You need to see the pictures to get the outcome – but I’m still here to tell the story.  
Adjusted factors on white dice - Instant death of two elements  including CinC averted with these combat rolls.
Next bound and two of the annoying enemy light horse get cataphracts up the rear and danger passed.  But we were now broken up and heading in the wrong direction and would need to regroup.  Regroup we did eventually and we then had to catch the enemy before we took enough overall damage to break our army. 

About this time Bobarsaces, in a moment of brave madness, remembered he was a KnX general that fights as superior against mounted, rushed forward and attacked a very vicious LhF.  It must have been very vicious because it sent him scurrying back (there’s that word again) to hide behind his juniper bush again.  (oh, okay he was fighting while overlapped from within the scrub against an enemy who was outside but really!?!)  He never ventured out again.

The pressure was maintained on the two original on-table commands and it finally told, the CinC’s command broke first and with the accumulated casualties took Bob’s army past the 50% mark.  Marginally to soon really, we had Bobarsaces in our elephant’s sights, almost surrounded and with only scrubby ground in which to run from our troops, some of which are faster than him anyway.  Another couple of bounds and he was doomed. 

To answer the title question – Yes, having arrived, and cheated, we did indeed win. 

So with the game over poor Bodasarace was still hugging the junipers, with his command in tatters and a supported elephant between him and the immediately available table edge. 
Did  ....  he  ....  survive??
The final position, his direct exit to table edge blocked by his own baggage, Bobarseces needs to run across in front of the elephant to escape capture.


NOTES
1)  Counting points has never been my thing, I trust my opponents can do the basic maths.  Nor will I hold up a game while I count MEs but may roughly do it in a quiet moment so that I have an idea what the task at hand is.  I don't ask for enemy command (or army) ME totals and avoid giving them by a "what you see is what you get approach".  I play to the visual effect but will ask an opponent to check break points if I think they may have missed the threshold being reached.  I regularly check and re-check my own commands so that I declare the changes at the appropriate time.

In this game the sheer size of the CinC's command was so unusual that I did openly count it and  commented on it.  Bob politely gave nothing away, and the stratagem worked. 

2)  This was my first attempt at drawing lines on photos and adding texts.  I clearly need to learn the application much better and practice more.  

# = Don't tell the wife this.  Especially the Wf(F) although the Wf(X)s and Wf(I)s may already know.******* 
* = To paraphrase one of those obscure western guys (a poet??).
** = We had done the Kushan civil war series which is just Parthians with elephants (and a few foot) so it was intended that we try a purer test of our tactical skills.  Having failed the tactical skills section I went strategic instead. 
*** = The “buttocks of death” from DBM days returned albeit in a different form.  Having elephant backsides reversing into your face is an event that it is highly recommended you strenuously avoid.
**** = Used a lot by us as more than 10Lh gets unwieldy to manoeuvre and especially keep out of trouble against strong mounted.  At 16ME it maximises the dishearten point for the minimum APs and with Lh commands being disheartened makes breaking almost automatic as it hard not to die on a +2 -1 =1 very regularly.  We find 11 elements (10 Lh + general) at 16ME just as effective as 13 elements (or more) for 18ME but 8AP cheaper and less likely to be caught in too many groups to escape when the PiPs are low.  Better survivability and less cost for equal hitting power.
***** = Well, as fast as fully equipped cataphracts can go.
****** = “Don’t stand in front of the guns or behind the elephants”.  Part one is obvious, part two is toilet humour but it means anything that is destroyed in combat while forward of the artillery takes the artillery with them while the elephants take everything behind them when destroyed.
****** = See the tail end of  "Things get Worse & Worse" (24 July 2012) for a explanation of the 'wife' troop typing.