Wednesday, 16 July 2014

The Fight for Persia - Rules of Engagement

A series of games loosely connected by a narrative and predetermined list of players and armies. 


On occasions the players in our small group of DBMMers in Bangkok like to change our (almost) weekly games arranged by whatever people feel like playing to something more structured.  This also gives the options to get (near) historical match-ups which are sometimes preferred by some of us.

In the past, with just two participants, we have played and narrated both a Kushan civil war and a Parthian civil war.

The rules were very loose and the aim to have interesting games quickly became a breeding ground for unusual and dodgy cunning plans often stretching some of the parameters to there limits.  I enjoyed the numerous surprises that were generated and the inventive narrative that became attached at times.

There also developed via emails a run-up to most games full of 'trash talk', threats, promises and general intimidation along with rule queries, often as 'red herrings'.  Much like pre-battle preparations really.

With a third player now a regular member of the game nights we decided to play a game series again.  With the completion of a Sassanid army all of us had at least one army for 3rd century Persia/Iran that we could play with.  The Sassanids first outing was the first game in the challenge.

We actually played the first three games before we determined to actual Rules of Engagement. Anyway here they are, in case anyone else wants to use them.

But first - Meet the Team

Aren't we a handsome suave bunch ??

Rules of Engagement

  • King of Kings starts as holding the table.  The potential rebels determine who will play first any way they agree.
  • After a game, which must have a result, the winner stays holding the table.  The loser goes to the end of the rebel/challenger queue.
  • The first player on the rebel/challenger list plays the table holder.
  • Repeat with the first(only) player(s) on the rebel/challenger list until there are no ‘live’ challengers left.
 *** The table holder who has no challengers is the King of Kings and overall victor.
  • The Army Lists must be extant at a set year (our year is AD225) and location (ours is generally Persian [modern Iran]).
  • However the Order of battle (OoB) may be picked from the Army List as at any chosen year from its entire time span.  The list restrictions pertaining to the chosen year must be followed as normal. Locales specifically outside the area AND also not in the lists home area aren't permitted.
Wayne is Parthia and the reigning King of Kings (owner of great wealth, power, dashing good looks and harems).  Bob is the Kushan Empire (owner of exquisite sofa coverings and soft furnishings and ample attendants to plump them) and Nash is Sassanid Persia (owner of an uncountable number of fluffy cats, enough floor rugs for them to squat on and slaves to groom them).
  • In this story telling series of connected games the players must retain the same army list although the OoB may change between games.
  • In the first game The King of Kings (real or temporary) defends.
  • Thereafter the King of Kings may choose to be the defender.  
  • If he doesn’t choose to do so then the next Rebel/Challenger may choose to invade OR to dice as per the rules.  
  • If a dice roll is to take place all army lists are deemed to have the same aggression (nominally 1).
  • The determination of invader and defender is made as soon after each game as is practical.  It must be several days before the next game to allow development of cunning plans, threats of horrendous outcomes, name calling, laying of red herrings, deceptions and second guessings.
          Ideally it will occur at the end of the current game night.
  • Each player starts with five ‘lives’.
  • Each player loses one(1) live if their CinC element is destroyed and they lose the battle.
  • Each player loses one(1) live if defeated and they were invading  
  • Each player loses two(2) lives if defeated and they were defending.
  • A maximum of two(2) lives can be lost per player per game.
  • A player that is defeated in any game using an Ally command loses the use of that Ally for the duration of the game series.  If the Ally is shattered yet the game won then it also becomes a lost Ally.
  • The King of Kings always plays alone.  The rebel challenger may take as many players as they have commands.  
By the time we got the final Terms of Engagement organised we had all  fallen to three(3) lives in the first three games because the Partian King of Kings was defeated while defending (-2 at maximum so no cost for the destroyed stand-in CinC), Bob lost while invading (-1) and fell off his elephant (-1) and the false King of Kings Nashur III's grandfather lost while invading (-1) and was personally slain by the genuine King of Kings (-1).  No cost for losing Nashur II trampled to death at a canter during a game that ended in victory.


The Parthian Empire

PARTHIA
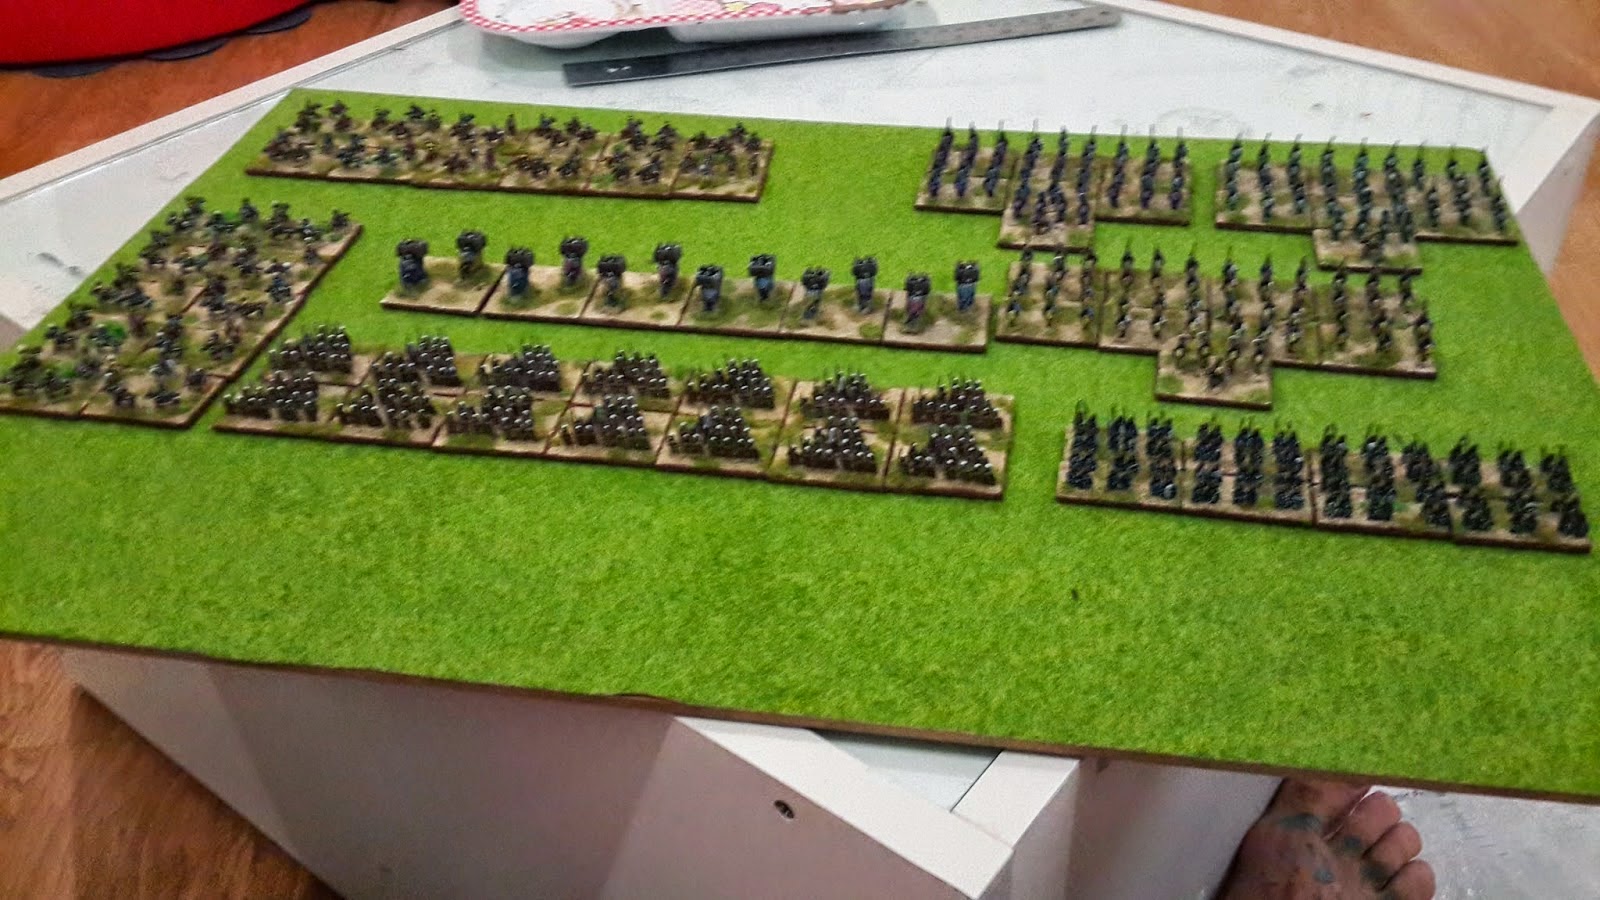
Generals to the right in front of baggage.  Hatrene ally front left.  Cataphracts and fast light horse make up the rest.
For some details we have the four generals, all cataphract iKnX plus a mass of other cataphacts all irregular. In fact this is a totally irregular army.


Next we have the iLhF with the pointy coloured hats that changed their battlefield performance back in 2012.


Then there are some more iLhF this time without hats but with Parhtian style headbands.  There are four different colours of headband with all four men
on each base having the same colour. This allows commands to be distinguished once they inevitably get mixed together during combat.

The blue and green are too close and are inseparable to my naked eye so I tend to use just three colour groups.

The generally used allies from Hatra. Massed iBwO, a couple of iPsS and iLhF with a cataphract general and his companion element.

These generally hold up a section of table and scare away most fast moving horsemen (although of late they have suffered when charges by rCvS).


Lastly the baggage by itself.  Simple and effective camel trains.

The rear is a mule train only to distinguish the ally's baggage.
This army is actually morphed out of my Kushan army which I generally prefer to the Parthians.  My Arabo-Aramenians supply the Hatrene ally.

On the left is the bulk of the Kushans not required including the elephant corp with the optional elphant mounted general.
And a couple of  Hatrene cataphract camel elements.  These are available to the ally but to date haven't been included in an OoB as yet.

I have modeled the full complement for the Hatrene version of the Arabo-Aramenians but quite frankly their behaviour scares me more than any opponent.


So that's my set of figures.  After the average look of the first 6mm army I did (Khmer with assorted morphs) I am very pleased with the appearance I achieved here, plenty of colour and variety.  On table performance though has been highly variable although always enjoyable.

The Kushan Empire

A selection of Kushan troops
The Kushan Truely Accurate Publicity Department supplied the above photo stock shots.  In the interest of surprise and uncertainty the Kushan Emperor is keeping his troop options very much to himself, especially as he has just acquired the throne of the King of Kings.  

Bob's optional Kushan troops are very different to mine in that he prefers a much heavier foot presence and as such has many of the Indian troops available.  He also usually changes his OoB almost on a game by game basis so you never know what you will face beyond the core compulsory troops.   No doubt, just to make a liar of me, the next battle will see an all mounted Kushan army appear!!

The Sassanid Persians

The Sassanids come in their all regular command form and as such have a very high proportion of compulsory troops.  Add the elephants and the OoB is almost written for you.  Of late, elephants have been scarce and their place taken by more numerous foot and light horse options.
SASSANID PERSIA
An outstanding spread of superior cavalry, elephants, conscript levies, some light horse and a Hun ally.

Asavaran lurking behind the Dailami auxillia.


The elephant corps sheltered by the hordes of conscripted levies


And lastly, some light horse, including a Hun ally for use on the days that the elephants over sleep.

While an army of many parts the high compulsory costs tend to very much restrict a mix and match approach to the OoB, more a this or that option choice.

It'll be a special day to see all the Sassanids on the table at the some time.


Wednesday, 9 July 2014

The Glorious Sassanids

1. the whole lot
left to right - horse archers, Sabir (back), Elephants (centre), Levy (front), Asavaran (centre and back), Dailami (front)
 2. Horse archers, levy, and elephants


 3. Dailami and Asavaran in the back ground
 4. The Sabir Ally general jumping over a bush


 5. another shot of the Horse Archers
 6. The Levy - ready for anything
 6. The whole bunch again
 7. Asavaran and elephants (with Kushan hills in the background?)

Monday, 7 July 2014

Holy Crap BATrianMAN!! – What a Blood Bath!!

Having killed two rebel leaders, one personally, there was a break (a week without a game) while the new leaders tried to overcome their fear of the Whatagases the Indestructable, so he went for a holiday at the lakeside**. 

So the great Parthain Army will be lead by Whatshisnameces, loyal general and some royal cadet branch offspring.  This was reinforced as a sound idea after the pre-game ‘trash talk’ took place and cunning and devious plans were formed and alluded too but the tone went downhill after the rWf(F) put out some embarrassing information*. 

You may have read the SIN (Sassanian Independent News) Article "Rugs to Riches - A Cats Tale" posted in the previous blog.  SIN is really "Sycophantic Information for Nashur" and was of course a simplistic version for the infant Nashur III.  Having lost two generations of kings (CinC elements destroyed) in three weeks the sorry Sassanids are now ruled by a boy only just off the breast!!

In the interest of factual reporting the PPPPPP (Parthian Peoples' Popular Perfectly Precise Press) will provide a brief but picture enhanced version of the Battle of Wounded Elbow Fort.

Firstly the Statistics
*   Five out of eight generals died on the field including both CinCs. 
*  Of the three remaining one was broken and one’s command disheartened, both on winning side.
*  Of eight commands only three remained fully functional, two of these on the defeated side.
*  The victor suffered 49.01% casualties and the loser 55.21%.

At one point two bounds before the end we thought the "knock on" from two breaking Sassanid commands would take the army to break point - a count up showed it didn't by just 1.5ME - all that was needed was a single (QKable by KnX) CvS element.  The moment passed as the "knock-on" effect was lost but it was noted that a single loss from a disheaten command would break the command and give the Parthians a victory.

And the quicker picture version .....
The opening positions.
The BuAf in the enemy side works well and gives flank protection and attack options.
The size of the CvS command was a shock!
Here come the fights!!
On the left we had numbers & position and were confident.  On the right our conscripts were in fear.
But they lived up to Parthia's expectation and sent the CvS packing - initially!!
While hard pressed on the right by the massive 42ME CvS command the Parthians were comfortable that numbers and surrounding the Sabirs and a small Sassanid command would be achieved before the CvS caused to many KnX casualties.

How NOT to kill enemy general with your troops in the rear.
This unraveled in a single bound where on the left we had three combats that the Sassanids had to roll 3up on the dice just to survive (not be destroyed) and two were generals including one with a Parthian LhF in the rear.  

Against the odds we lost all three combats and the Sassanid and Sabir retaliation was brutal and our advantages were lost.
After that we fought a grinding casualty for casualty battle were we were eventually beaten after, as mentioned above, the Sassanids survived the breaking of two commands in one bound plus the disheartening of a third.
Also rolling the odds badly - one dead CinC.
After reigning for just two weeks Nashur II died in battle, cantered over by my (now deceased) KnX general.  The Parthian commander, Whatshisnameces (of previous civil war fame), having failed to run down the overlapped Sabir general was surrounded and shot down with un-manly arrows (CvS and LhF/S).  Now the infant Nashur III will be located and revenge extracted.
Yes, that the most dashing bunch players you'll find in Bangkok!!


Notes:-
* = Besides Watagases wasn’t going out to be ridiculed and tormented by the redels as “naughty daddy” after the rWf(F) had referred to me as such*** on the dreaded ‘facescroll’ message service.

** = And besides,it had also been noted on said ‘FaceScroll’ that it was time I suffered a total drubbing.  So all in all a perfect time for a lakeside retreat for the King of Kings.

***  =  The rWfF calls me “Daddy” after a character in a Thai TV ad for coconut milk who, like me, always needs/bring home a bar of chocolate after work.  

It gets expanded to “naughty Daddy” when I stay out late, play practical jokes of the family or buy even more wargames “little friends” to expand the army options.  This time I posted photos of her asleep in a hammock when she was supposed to be selling melons and coffee in her roadside stall.


From Rugs to Riches - A Cat's Tale

From Rugs To Riches
The Persian Conquest

Due to an unexpected heat wave (Bob’s air-conditioners breaking down), this was almost the battle that never was – in fact for Whathisgases this was a battle that never was, as he failed to muster the courage to appear on the field!

It was a hot day. The sun beat down and the heat shimmered around the small Parthian hilltop town of Injured-Elbow. The glorious Sassanids, in their hunt for revenge had tracked the craven Parthian leader to this isolated settlement deep in the Parthian territory, only to find that the faint-hearted Whatshisgases had already bolted, abandoning his troops to the fury of Persia. The Parthians had chosen their ground well with flanks secured by marshland and rich lemon orchards – the fruit coincidentally matching the colour of the Parthian tyrant’s back!

With the fortified town in the centre of the battlefield the Parthians deployed with their heavy horse to our right. To our left, the Saka ally and other horse archers. The bulk of the Asavaran were deployed to our right with the fearless Sabir ally, Bobzilla, facing the Parthian cataphracts. Our left flank was guarded by the multitude of levies that had followed to watch the spectacle of Persia’s dominance.

With that the battle commenced. The parade ground precision and elegance of the Asavaran stunned the weak-hearted Saka, who watched in awe and despair as Persia’s finest coolly formed up and sped like the desert wind along the road to form up on the left flank. This was all too much for the Saka. Their initial thought was to emulate their Parthian lord and turn tail!

The Parthian general, in seeing this, showed his metal and quickly rallied them. It was now the Parthians turn to manouvre. Splitting their cataphracts, they began their advance which would eventually lead them to either side of Injured-Elbow.

As the Parthians advanced, the courageous Bobzilla was unperturbed and held his ground (only having 3 pips for the first 2 turns may have influenced this). The Sassanid sub general moved up to support him as the Parthians filled the hole left by their cataphracts with their infamous horse archers (rumour has it that one should not get too close behind them as they flee, as they are famed for giving one last act of defiance (or fear) as they run away, commonly known as the ‘Parthian Shit’).

As the Parthians moved closer on our right, the Asavaran lined up on our left. The Sabir saw an opportunity and a small force rushed out to the right to encircle the horse archers that had moved towards the centre. The shiver of fear that went through the Parthian ranks was clearly audible! In an act of desperation, after revealing the ineffectual elephant ambush, the Parthians rushed in to lure the Persian general into combat and to attack the Sabir. Being a true warrior (unlike the deserter Whatshisgases), our valiant subordinate moved In for the kill and supported by the Asavaran and Sabir horsemen, dispatched the enemy general in one swift stroke. Again the groan of the Parthians was heard rippling across the field of battle. Although the Parthians fought back with some courage, their effect on the Sabir was minimal. The élan of our Persian heroes, brave as it was, left them somewhat exposed, and now the Parthians sought revenge by moving their elephants into contact and attacking the Sabir in the rear – reminding us of the Greeks of old! Now the battle moved ever towards its hard-fought-for and gory crescendo.

Our valiant sub general fought bravely, repelling the elephants, even when simultaneously attacked in the rear – much to the chagrin of the pusillanimous Parthians.

Lo, another Parthian general, fully armoured and mounted on a fine steed (which we are certain he mounted from behind) had moved away from his retinue (the other catphracts were hugging the hill of Injured-Elbow and were more than reluctant to press forward) and found himself alone and exposed. He was not alone for very long!

The cheers and whoops of the Persian light horse rang across the battlefield as they supported the charge of the dauntless Asavaran. The light horse swooped onto the flank, the Asavaran charge was fierce, and another Parthian general was lost – the commander in chief – brave substitute for a lily-livered king!

Alas, but soon it was the Persian’s turn to groan. Our resolute hero, pride of Persia, was flanked again and this time, he fell. But there was no time to mourn the fallen. Meanwhile on the left flank, the main force of the Savaran had charged the hordes on their flank. Bravely the peasants of Parthia fought, putting the ineffectuality of their masters to light, and repelling the first charge of heavy cavalry as the cataphracts of their nobles came forward and were easily repulsed. However, the glory of the hordes was short lived and the fine horsemen of Persia began to ride them down.

Desperation was coming to both sides. The Parthians, massing around the base of Injured-Elbow were surrounded. Two of their commands had crumbled. Two of their generals lay slain.  Likewise, the Sassanids had lost two generals and two commands. It was now or never.

Seeing his chance for glory, Nashur II moved in to support the attack of the Asavaran as they chased down the Indo-Parthian light horse. In doing so, he moved within range of the cataphract general. The Parthian could not resist. He came thundering forward, charged home and slew our illustrious leader! But stay those tears. Mourn not for Nashur II. By giving his life he drew the enemy general out of his ranks and deep into the arms of the noble Asavarn. Seeing the glorious sacrifice of their king and calling the name of the hear apparent, they surrounded the hapless Parthian and ground him into the dust!

And thus, under the shadow of Injured-Elbow, the Parthians were defeated. A bloodier battle there never was. A more righteous victory has never been more deserved. A sacrifice more noble has never been given!

All hail Nashur III, King of Kings, Lord of Decorative Floor Coverings, Groomer of Fluffy Cats, Founder of the Rugpus Dynasty. Long may his reign shine his light upon us.


Monday, 23 June 2014

Cataphracts or Cushions

"Don't worry, the tyrant will soon be smothered by King Bobazodeo the Well Plumped of the Kushan Empire. We will bring peace freedom and soft furnishings to the whole of Iran"  as etched on FaceScroll by scribes of that King.

Nashur I lies dead and Nashur II has run for the hills* so Watagases the Indestructable turned his eyes towards the Kushan vassals that had been more bellicose than usual.

King Bobazodeo the Well Plumped Kushan required a lesson in fealty from the King of Kings.

Being from the Kush he was likely to be toting a number of elephants.  Elephants hate artillery, which we don’t use as distance killing is so un-manly (only our vassals ever use bows) so the next best thing is masses of peasants with pointy sticks to throw themselves in front of said menace.  To this end we moved into a newly constructed fortified town [Read:- I spent all the night before constructing, painting and basing a 2x2 PF bound BuAf in Arabic style] and expelled the militias, town guards and peasants out into the field to become elephant bait.

The compulsory BuAf was to be positioned on a road placed as close to table centre as possible, packed with militia to defend and sally out to harass flanks and rears OR to otherwise force Bob into a constricted area.  Hetra was again required to supply a large line of bows to also control a section of the table.

My Order of Battle contained 29 PsI elements which as well as being my elephant delayers bought all four commands to 24ME or a bit more.  It did require me to be the defender but Bob agreed to this option as he rushed to claim a greater crown.

We were surprised to find how little support Bobazodeo had within his nation’s nobility, only the minimum accompanied him and the majority of his force was lowly vassal/conscripted foot.  Such a disappointingly non-glorious enemy to crush. 
Opening Positions - And a 'spur of the moment' plan.
And the only elephants that showed up was a single pair of racing elephants ridden by the CinC himself.  Why have a cunning plan if the enemy fails to bring the required targets??

As dawn arrived on the day of I was forced to execute a number of engineers who had failed to construct roads as ordered [Read:- the terrain dice diced the road out of existence] so the BuAf was eventually place on the table edge of our left flank deep in Bob’s territory.  We started between two marshes, some scrub in our centre rear and an orchard on the centre line to the right.  The Kushans hugged a couple of gentle hills (in more ways than one it turns out).

As our plan to pivot on the BuAf and swamp the elephants with peasants had been rendered useless by the engineers we had devised a new plan once the armies had been deployed.  Hold the centre and right by skirmish and delay and use massed light horse, with a few cataphracts included, to overwhelm the Kushan right (our left) and then push in behind their lines.

The plan had the effect of scaring the Kushans to move more light horse from their left to right (our left) making the option to send a large group of light horse to swamp the few enemy left on that flank.  The Kushan centre stayed inert**, except for Bobazodeo himself of the sole elephant and a few inferior pikes.

We pushed out to our left in large numbers, including the flanks KnX general, and send half the cataphracts into the fight as well while Watagases and the remaining cataphacts plus a few light horse hovered back a bit to cover flanks and keep the enemy foot honest. 

Elephant races light horse between spectator lines.
At this point the elephant bourne Bobazodeo came out from behind his pikes to head off in search cataphacts to stomp so he was mugged at long range by our LhF support who deviously turned him into a no recoil position.  But Bob just as deviously shot the overlap off with bows so the red head-banded elite fast light horse had to fight on for several bounds with limited support but he keep recoiling across the front of the entire enemy bow line with the racing elephants in hot pursuit but against the odds was not destroyed.  Finally the light horsemen fell but was replaced by another on the elephant’s flank that turned him so fast to the left (to face combat) that Bobazodeo fell from his howah and was trampled to death (on a 1-6) along with two bow elements that had moved up to support a flank before the elephant was turned in combat.
How elephant borne Kings die. 
The fight out on the left was continuing as the LH lottery does, with casualties on both sides but with my numbers telling, although by now the Kushans were spreading their casualties over three commands.

We will ignore the action at the BuAf where the Kushans successfully scaled two sections of walk and expelled some of the defenders.  It was a total sideshow with no impact on the outcome and we had mostly recovered the town by battles end anyway. 

On the right my an impromptu LhF outflanking manouver ran over the gentle hill in column at full pace straight into a line of bows in ambush behind the crest!! 
Oh bugger!!   Ambushed!!
We took a couple of casualties before we U-turned and retired in (not very) good order.  Thrilled at their success the bow line came forward off their hill.

Having recovered our formation we then took the daring action of running to the table edge and running past the end of the bow line hoping to get onto its rear, all the while pushing massed PsI out into the open with the KnX general to keep the bows occupied frontally. 
They weren't expecting that, were they!!
This took the bows by surprise and they had low PiPs in response before we got good PiPs that saw us attack their rear and flank.  Apart from one bound where we embarrassingly bounced off the rear of some bows we started to chew our way down the line destroying them as we went.


Payback for the ambush.  It helped break the Kushans.


CinC & KnX charge bows with LhF in their rear.
The light horse lottery on the left flank, with a few cataphracts in the mix, continued on until Bob was a bit shocked that his LhF that rolled an ‘5’ was still doubled and killed (KnX general in my bound with a ‘6’) and thus broke[?] a command.  As Whatagases the Indestructable had led the remaining cataphracts in a charge on the Kushan’s Indian bow line and run it down and then some had pushed on into the LhF beyond it was battle over.
The Kushans position on the right unravelling as numbers count.
And in a bound that took several Kushans including a KnX general it was finished.
So now it’s two battles defending the King of Kings’ crown and two dead enemy commanders although only the first by my own hand.  Who’s next?? ***
Final Positions - A plan that actually worked out in general.


* = Nash had work commitments out of the city.
** = This irregular command rolled 5 1’s out of the 9 PiP rolls Bob made.
*** = Given work and harem commitments we may struggle to get the correct players in the same location at the same time this week.  A rebel on rebel game has been mooted or else I may need to seek out Bobazodeo’s son and heir.


Monday, 16 June 2014

Nashur, Nashon, Nashgone.

"King Nushur the Untested meets old King of Kings Watagases the Indestructable"

Whatagases the Indestructable (from past exploits where he regularly got into personal dire situations in battle but proved immune from death/losing the crucial combats) has had a long, pleasant and fruitful reign.  But now there’s a new boy on the block, a scion of the Persian house of Sassan, a King Nashur who appears to be a rebel on the borders of a peaceful Parthian Empire.

Philip Nash (or just plain Nash – or Nashur in royal persona) is a newer member to our small band of players in BKK.  He’s a past DBM player that has converted to DBMM here, plus an exquisite painter of the 6mm figures and despite minimal experience with these rules is proving to be a more than competent general, certainly more than a match for me.  His beautifully presented Marians Romans enjoying an outstanding run of victories against Bob and I regardless of the armies we field.

With the arrival of Nash’s stunning Sassanids we decided to reprise our middle eastern empire civil war (vaguely historically matched) concepts to give a background to a series of battles, this time with a three way scheme of things. 

As the current champion I get to be the Parthians again, Bob will be a Kushan rebel and Nash the rising Sassanid kingdom.  The non-active rebel would be an ally (or sub) general for the rebel commander.  The victor of each battle would retain the table as King of Kings against the next rebel.  After two or three (number not yet determined) losses you would be out and the ‘last man standing’ would be declared victor and permanent “King of Kings” (or at least until next time – being Emperor is so uncertain!!).  Have your CinC killed in battle would carry a (also still undetermined!!) penalty as well.  

So after seeing only a few online photos of the freshly painted and based Sassanids they arrived on game night for their first outing, with a secret Order of Battle (OoB) as well.  And what a sight to see they were too – outstandingly paint, based and with high visual impact – plus ten elephants on five bases, the last thing a cataphract based army wants to see!!
The Parthian army bought the vassal Hatrenes as an anti mounted wall of bows, with a couple of cataphract supports (including general) and a couple of LhF as well, as this would control a section of battlefield even if they weren’t overly strong in attack.  The attack would be driven by the CinC’s command’s massed cataphracts which would be very strong against all in the Sassanid force except the elephants, which had to be avoided.  One command had ample AxO and PsO to act as the anti elephant shield if they could get into position, with the task of tying the elephants up rather than killing them outright as this would eliminate the elephant risk anyway.

As we expected to significantly outnumber the Sassanids our LhF troops would be used to outflank and surround the enemy.  Thus we had two functional formations of light horse, one sharing the Ax & Ps command where they’d act independently if the foot didn’t require PiPs to screen the enemy elephants and the other command being a smaller purpose built light horse command.  All four generals are KnX and able to detach from their commands and join the cataphract line if required.
DEPLOYMENT
The battlefield proved to be very open with us deploying between two marshes, one each on each flank but with space to march around the outside of them.  Just inside our left hand marsh was a low unnavigatable river cutting off part of the table.  There was a couple of irrelevant gentle hills around but the Sassanid side was essential open and flat.

New Overhead Photo Test - Do you like it??
We set the deployment plan to hold the right with the Hatrene ally, have the foot in the centre to go either way after the elephants and the cataphracts back(ish) left to give options once the elephants position was known.

The Sassanids deployed first and proved to be very small.  All regular CvS including generals plus five elephants meant only three AxS foot and a few LhF (and no baggage) and none of the massed hordes we had been expecting (after much online chat about how to best paint such quickly and effectively).  Our deployment plan was less than ideal against that mix and layout and we found the space between the marches a bit cramped for our numbers but we were not too dissatisfied about the starting positions.

Then came the “dancing elephants”!!  And our run of below average PiP rolls.
Opening Moves and "Dancing Elephants"
We aimed to push the cataphracts straight forward into the enemy mounted on our left (Sassanid right flank) bypassing the elephants which would be threatened by the Ax/Ps mix in the centre.  The Hatra command was to push up to keep the flanks of our centre as secure as possible without themselves getting too exposed.  Lastly the LhF section of the Ax command was to sweep from the rear centre of the table all the way around our right flank, as PiPs permitted, as a general threat to envelope and rear attack the Sassanid’s left hand forces.  

BUT there was no baggage to pilfer!! – what sort of ‘king’ can’t afford the prestige of gilded tents and women??

The rapid dance of the elephants sideways (moving in and out of column) across the field put pay to the cataphract plan and they had to form column to the left and try and get past the elephant threat before it could advance further.  This was done successfully and they swept aside all the LhF and CvS that tried to get in
End of the "Elephant Dance".  It doesn't look good for the Kataphracts.
their way to the point that at the battle’s end they had opened the Sassanid flank and had a possible unopposed run at the rear of the centre of the Sassinid forces.

To facilitate the escape of the cataphracts a column of LhF interposed itself in front of the oncoming elephants where they died within a couple of bounds but gave enough time for the cataphracts to escape and the Ax to arrive and wrap up all but one of the elephants.

Avoiding the Elephants
That one elephant on the flank outside of the line turned outward to engage a cataphract general who had been wrecking havoc on the Lh and CvS, taking them to disheartened status quickly.  The havoc stopped abruptly as he was squashed in extremis under the heffalumps feet (down to a 1-6 + QK) and his command of all LhF thus broke.  

However another KnX from the CinC’s command took the easy charge into the ElO’s rear where much to their surprise the elephants
Containing Elephants and Making Gaps.
just shrugged of the attack, turned to face the startled cataphracts and threatened to charge them in turn next bound.  Luckily the elephant borne warriors heard of the personal demise of (now ex)King Nashur and like the rest of the Sassanids chose to flee the field instead.


Devastating Elephant Stomping


Meanwhile ....

Over on our right side, two commands of Sassanid CvS had formed a single line to charge the long line of Hatra’s finest BwO, while trying to avoid the ruler of Hatra and his friends (both
Hatra awaits the CvS charge.
KnX).  Once aligned they started the charge and the bows killed one, and recoiled 80% of the rest, a couple surviving only on the basis of their superior status.  The charge continued and this time the bows were less successful although again the superior status of the cavalry aided them.  Third charge and they were into close combat (apart from the end CvS that was mugged much to his surprise by a KnX coming in on his flank from our centre).  Again occasionally using the superior status to save themselves from defeat the CvS steadily cut its way through the bow line and the Hatrenes broke.

We discussed and commented that the CvS’s superior saving factor was important in allowing this charge to stay coherent, get into contact and break through.  Without the “s” we felt that CvO would have been broken up, gone in piecemeal and probably failed with this task.

Now with two of my commands broken a quick army breakpoint calculation was required but with no casualties on the other two commands and one of the commands being the small one, even with the breakage knock-on effect we were still within safe limits.

But we needed to finish this quickly and while their left rear was open to us, cataphracts aren’t known for their speed and it would be many bounds before they closed on the rear of the enemy.  There was a semi-gap in the centre of the Sassanid line created as the elephants went one way and the CvS went the other way after the Haternes.  A few single elements vaguely defended it and I had been pushing some LhF and two KnX generals into the area as a generalised threat.  Nash chose to close this gap with more elements including the CinC CvS who became an overlapped single element after winning a combat.  In a move with more than just a taint of desperation I opened a route for my CinC KnX to contact him and provided the second overlap with a PsO that was initially intended to flank the elephants when all other elements proved to be too far away.  

With factors two higher, “S” status to break draws and a QK you’d expect to win. 

Death of Nashur I
We did.  

Nushur died on the end of my kontos, the Sassanids broke and the survivors all fled the table. 

As always a great tense and fun game, for me poor PiPs early on which caused proplems were offset by more PiPs later when I really needed them.  Combat dice didn’t feel uneven although I was frustrated by the CvS being rescued from recoil/death so often from their status.  However Nash was expecting more from them in decisive and quick results from their status, although had they met my mounted he may have got that as against foot their QK it’s a less effective quality.

Unfortunately for such wonderfully presented figures they failed to win their first outing but I hope
Final Positions as the Sassanids Broke.
they'll return again often, they will always be a sight to see and a difficult challenge to defeat.

Next week we are marching more eastward to deal with renegade Kushans under some obscure leader, Boborsomesuchages or something similar.
Scheming Rebels