Showing posts with label Civil War. Show all posts

Monday, 23 June 2014

Cataphracts or Cushions

"Don't worry, the tyrant will soon be smothered by King Bobazodeo the Well Plumped of the Kushan Empire. We will bring peace freedom and soft furnishings to the whole of Iran"  as etched on FaceScroll by scribes of that King.

Nashur I lies dead and Nashur II has run for the hills* so Watagases the Indestructable turned his eyes towards the Kushan vassals that had been more bellicose than usual.

King Bobazodeo the Well Plumped Kushan required a lesson in fealty from the King of Kings.

Being from the Kush he was likely to be toting a number of elephants.  Elephants hate artillery, which we don’t use as distance killing is so un-manly (only our vassals ever use bows) so the next best thing is masses of peasants with pointy sticks to throw themselves in front of said menace.  To this end we moved into a newly constructed fortified town [Read:- I spent all the night before constructing, painting and basing a 2x2 PF bound BuAf in Arabic style] and expelled the militias, town guards and peasants out into the field to become elephant bait.

The compulsory BuAf was to be positioned on a road placed as close to table centre as possible, packed with militia to defend and sally out to harass flanks and rears OR to otherwise force Bob into a constricted area.  Hetra was again required to supply a large line of bows to also control a section of the table.

My Order of Battle contained 29 PsI elements which as well as being my elephant delayers bought all four commands to 24ME or a bit more.  It did require me to be the defender but Bob agreed to this option as he rushed to claim a greater crown.

We were surprised to find how little support Bobazodeo had within his nation’s nobility, only the minimum accompanied him and the majority of his force was lowly vassal/conscripted foot.  Such a disappointingly non-glorious enemy to crush. 
Opening Positions - And a 'spur of the moment' plan.
And the only elephants that showed up was a single pair of racing elephants ridden by the CinC himself.  Why have a cunning plan if the enemy fails to bring the required targets??

As dawn arrived on the day of I was forced to execute a number of engineers who had failed to construct roads as ordered [Read:- the terrain dice diced the road out of existence] so the BuAf was eventually place on the table edge of our left flank deep in Bob’s territory.  We started between two marshes, some scrub in our centre rear and an orchard on the centre line to the right.  The Kushans hugged a couple of gentle hills (in more ways than one it turns out).

As our plan to pivot on the BuAf and swamp the elephants with peasants had been rendered useless by the engineers we had devised a new plan once the armies had been deployed.  Hold the centre and right by skirmish and delay and use massed light horse, with a few cataphracts included, to overwhelm the Kushan right (our left) and then push in behind their lines.

The plan had the effect of scaring the Kushans to move more light horse from their left to right (our left) making the option to send a large group of light horse to swamp the few enemy left on that flank.  The Kushan centre stayed inert**, except for Bobazodeo himself of the sole elephant and a few inferior pikes.

We pushed out to our left in large numbers, including the flanks KnX general, and send half the cataphracts into the fight as well while Watagases and the remaining cataphacts plus a few light horse hovered back a bit to cover flanks and keep the enemy foot honest. 

Elephant races light horse between spectator lines.
At this point the elephant bourne Bobazodeo came out from behind his pikes to head off in search cataphacts to stomp so he was mugged at long range by our LhF support who deviously turned him into a no recoil position.  But Bob just as deviously shot the overlap off with bows so the red head-banded elite fast light horse had to fight on for several bounds with limited support but he keep recoiling across the front of the entire enemy bow line with the racing elephants in hot pursuit but against the odds was not destroyed.  Finally the light horsemen fell but was replaced by another on the elephant’s flank that turned him so fast to the left (to face combat) that Bobazodeo fell from his howah and was trampled to death (on a 1-6) along with two bow elements that had moved up to support a flank before the elephant was turned in combat.
How elephant borne Kings die. 
The fight out on the left was continuing as the LH lottery does, with casualties on both sides but with my numbers telling, although by now the Kushans were spreading their casualties over three commands.

We will ignore the action at the BuAf where the Kushans successfully scaled two sections of walk and expelled some of the defenders.  It was a total sideshow with no impact on the outcome and we had mostly recovered the town by battles end anyway. 

On the right my an impromptu LhF outflanking manouver ran over the gentle hill in column at full pace straight into a line of bows in ambush behind the crest!! 
Oh bugger!!   Ambushed!!
We took a couple of casualties before we U-turned and retired in (not very) good order.  Thrilled at their success the bow line came forward off their hill.

Having recovered our formation we then took the daring action of running to the table edge and running past the end of the bow line hoping to get onto its rear, all the while pushing massed PsI out into the open with the KnX general to keep the bows occupied frontally. 
They weren't expecting that, were they!!
This took the bows by surprise and they had low PiPs in response before we got good PiPs that saw us attack their rear and flank.  Apart from one bound where we embarrassingly bounced off the rear of some bows we started to chew our way down the line destroying them as we went.


Payback for the ambush.  It helped break the Kushans.


CinC & KnX charge bows with LhF in their rear.
The light horse lottery on the left flank, with a few cataphracts in the mix, continued on until Bob was a bit shocked that his LhF that rolled an ‘5’ was still doubled and killed (KnX general in my bound with a ‘6’) and thus broke[?] a command.  As Whatagases the Indestructable had led the remaining cataphracts in a charge on the Kushan’s Indian bow line and run it down and then some had pushed on into the LhF beyond it was battle over.
The Kushans position on the right unravelling as numbers count.
And in a bound that took several Kushans including a KnX general it was finished.
So now it’s two battles defending the King of Kings’ crown and two dead enemy commanders although only the first by my own hand.  Who’s next?? ***
Final Positions - A plan that actually worked out in general.


* = Nash had work commitments out of the city.
** = This irregular command rolled 5 1’s out of the 9 PiP rolls Bob made.
*** = Given work and harem commitments we may struggle to get the correct players in the same location at the same time this week.  A rebel on rebel game has been mooted or else I may need to seek out Bobazodeo’s son and heir.


Monday, 16 June 2014

Nashur, Nashon, Nashgone.

"King Nushur the Untested meets old King of Kings Watagases the Indestructable"

Whatagases the Indestructable (from past exploits where he regularly got into personal dire situations in battle but proved immune from death/losing the crucial combats) has had a long, pleasant and fruitful reign.  But now there’s a new boy on the block, a scion of the Persian house of Sassan, a King Nashur who appears to be a rebel on the borders of a peaceful Parthian Empire.

Philip Nash (or just plain Nash – or Nashur in royal persona) is a newer member to our small band of players in BKK.  He’s a past DBM player that has converted to DBMM here, plus an exquisite painter of the 6mm figures and despite minimal experience with these rules is proving to be a more than competent general, certainly more than a match for me.  His beautifully presented Marians Romans enjoying an outstanding run of victories against Bob and I regardless of the armies we field.

With the arrival of Nash’s stunning Sassanids we decided to reprise our middle eastern empire civil war (vaguely historically matched) concepts to give a background to a series of battles, this time with a three way scheme of things. 

As the current champion I get to be the Parthians again, Bob will be a Kushan rebel and Nash the rising Sassanid kingdom.  The non-active rebel would be an ally (or sub) general for the rebel commander.  The victor of each battle would retain the table as King of Kings against the next rebel.  After two or three (number not yet determined) losses you would be out and the ‘last man standing’ would be declared victor and permanent “King of Kings” (or at least until next time – being Emperor is so uncertain!!).  Have your CinC killed in battle would carry a (also still undetermined!!) penalty as well.  

So after seeing only a few online photos of the freshly painted and based Sassanids they arrived on game night for their first outing, with a secret Order of Battle (OoB) as well.  And what a sight to see they were too – outstandingly paint, based and with high visual impact – plus ten elephants on five bases, the last thing a cataphract based army wants to see!!
The Parthian army bought the vassal Hatrenes as an anti mounted wall of bows, with a couple of cataphract supports (including general) and a couple of LhF as well, as this would control a section of battlefield even if they weren’t overly strong in attack.  The attack would be driven by the CinC’s command’s massed cataphracts which would be very strong against all in the Sassanid force except the elephants, which had to be avoided.  One command had ample AxO and PsO to act as the anti elephant shield if they could get into position, with the task of tying the elephants up rather than killing them outright as this would eliminate the elephant risk anyway.

As we expected to significantly outnumber the Sassanids our LhF troops would be used to outflank and surround the enemy.  Thus we had two functional formations of light horse, one sharing the Ax & Ps command where they’d act independently if the foot didn’t require PiPs to screen the enemy elephants and the other command being a smaller purpose built light horse command.  All four generals are KnX and able to detach from their commands and join the cataphract line if required.
DEPLOYMENT
The battlefield proved to be very open with us deploying between two marshes, one each on each flank but with space to march around the outside of them.  Just inside our left hand marsh was a low unnavigatable river cutting off part of the table.  There was a couple of irrelevant gentle hills around but the Sassanid side was essential open and flat.

New Overhead Photo Test - Do you like it??
We set the deployment plan to hold the right with the Hatrene ally, have the foot in the centre to go either way after the elephants and the cataphracts back(ish) left to give options once the elephants position was known.

The Sassanids deployed first and proved to be very small.  All regular CvS including generals plus five elephants meant only three AxS foot and a few LhF (and no baggage) and none of the massed hordes we had been expecting (after much online chat about how to best paint such quickly and effectively).  Our deployment plan was less than ideal against that mix and layout and we found the space between the marches a bit cramped for our numbers but we were not too dissatisfied about the starting positions.

Then came the “dancing elephants”!!  And our run of below average PiP rolls.
Opening Moves and "Dancing Elephants"
We aimed to push the cataphracts straight forward into the enemy mounted on our left (Sassanid right flank) bypassing the elephants which would be threatened by the Ax/Ps mix in the centre.  The Hatra command was to push up to keep the flanks of our centre as secure as possible without themselves getting too exposed.  Lastly the LhF section of the Ax command was to sweep from the rear centre of the table all the way around our right flank, as PiPs permitted, as a general threat to envelope and rear attack the Sassanid’s left hand forces.  

BUT there was no baggage to pilfer!! – what sort of ‘king’ can’t afford the prestige of gilded tents and women??

The rapid dance of the elephants sideways (moving in and out of column) across the field put pay to the cataphract plan and they had to form column to the left and try and get past the elephant threat before it could advance further.  This was done successfully and they swept aside all the LhF and CvS that tried to get in
End of the "Elephant Dance".  It doesn't look good for the Kataphracts.
their way to the point that at the battle’s end they had opened the Sassanid flank and had a possible unopposed run at the rear of the centre of the Sassinid forces.

To facilitate the escape of the cataphracts a column of LhF interposed itself in front of the oncoming elephants where they died within a couple of bounds but gave enough time for the cataphracts to escape and the Ax to arrive and wrap up all but one of the elephants.

Avoiding the Elephants
That one elephant on the flank outside of the line turned outward to engage a cataphract general who had been wrecking havoc on the Lh and CvS, taking them to disheartened status quickly.  The havoc stopped abruptly as he was squashed in extremis under the heffalumps feet (down to a 1-6 + QK) and his command of all LhF thus broke.  

However another KnX from the CinC’s command took the easy charge into the ElO’s rear where much to their surprise the elephants
Containing Elephants and Making Gaps.
just shrugged of the attack, turned to face the startled cataphracts and threatened to charge them in turn next bound.  Luckily the elephant borne warriors heard of the personal demise of (now ex)King Nashur and like the rest of the Sassanids chose to flee the field instead.


Devastating Elephant Stomping


Meanwhile ....

Over on our right side, two commands of Sassanid CvS had formed a single line to charge the long line of Hatra’s finest BwO, while trying to avoid the ruler of Hatra and his friends (both
Hatra awaits the CvS charge.
KnX).  Once aligned they started the charge and the bows killed one, and recoiled 80% of the rest, a couple surviving only on the basis of their superior status.  The charge continued and this time the bows were less successful although again the superior status of the cavalry aided them.  Third charge and they were into close combat (apart from the end CvS that was mugged much to his surprise by a KnX coming in on his flank from our centre).  Again occasionally using the superior status to save themselves from defeat the CvS steadily cut its way through the bow line and the Hatrenes broke.

We discussed and commented that the CvS’s superior saving factor was important in allowing this charge to stay coherent, get into contact and break through.  Without the “s” we felt that CvO would have been broken up, gone in piecemeal and probably failed with this task.

Now with two of my commands broken a quick army breakpoint calculation was required but with no casualties on the other two commands and one of the commands being the small one, even with the breakage knock-on effect we were still within safe limits.

But we needed to finish this quickly and while their left rear was open to us, cataphracts aren’t known for their speed and it would be many bounds before they closed on the rear of the enemy.  There was a semi-gap in the centre of the Sassanid line created as the elephants went one way and the CvS went the other way after the Haternes.  A few single elements vaguely defended it and I had been pushing some LhF and two KnX generals into the area as a generalised threat.  Nash chose to close this gap with more elements including the CinC CvS who became an overlapped single element after winning a combat.  In a move with more than just a taint of desperation I opened a route for my CinC KnX to contact him and provided the second overlap with a PsO that was initially intended to flank the elephants when all other elements proved to be too far away.  

With factors two higher, “S” status to break draws and a QK you’d expect to win. 

Death of Nashur I
We did.  

Nushur died on the end of my kontos, the Sassanids broke and the survivors all fled the table. 

As always a great tense and fun game, for me poor PiPs early on which caused proplems were offset by more PiPs later when I really needed them.  Combat dice didn’t feel uneven although I was frustrated by the CvS being rescued from recoil/death so often from their status.  However Nash was expecting more from them in decisive and quick results from their status, although had they met my mounted he may have got that as against foot their QK it’s a less effective quality.

Unfortunately for such wonderfully presented figures they failed to win their first outing but I hope
Final Positions as the Sassanids Broke.
they'll return again often, they will always be a sight to see and a difficult challenge to defeat.

Next week we are marching more eastward to deal with renegade Kushans under some obscure leader, Boborsomesuchages or something similar.
Scheming Rebels

Saturday, 24 August 2013

Threesome Pillow Fight

Last Friday Dirk from the Yahoo DBMM list was in town, and joined us for a game. Wayne and I listed the armies we have, and Dirk said he'd like to try Kushans, and since the only thing finer than a Kushan army, is two Kushan armies, we decided to make it a civil war.

Dirk

Some other guy
After some messing around with some six sided random number generators, it was decided that Dirk would partner Wayne, and that I would play solo. I was the invader.

Wayne and Dirk's army list featured two mixed commands of cataphracts, elephants and a few foot, a command of 11 LH(F) and a Chionite Ally with 11 LH(S). I played a newly concocted list with a command of elephants and cataphracts, a command of cataphracts, a command of remnant Greek Pk(I), Indian Pk(F) and Bw(O) and a Parthian (Hyrkanian Rebel) ally with cataphracts, horse archers and Ax(O). Each command had exactly six LH(F) attached. The plan was for the cataphracts and elephants to be the decisive arm, the pike and bow command would form a center that would push forward and be hard to ignore, and the small blocks of LH would either be reserves, or could concentrate on a flank spreading the losses from a LH fight over several commands, and increasing the pips available.

As it happened though, the gentlemen opposite placed a large difficult hill in my center, so the pike command ended up defending the right flank next to the oasis, the Hyrkanians were to their left with their auxillia on the hill, and the other two Kushan commands of cataphracts and elephants were to the left of the hill. My plan was to sweep round from the left, with the Hyrkanians holding the hill and supporting the inside flank, while the pikes and bows on the right would defend.

Deployment
Wayne and Dirk trundled forwards cautiously on their first turn, with Wayne's horse archer command on my left racing for the open flank., but when it was my turn to roll the dice, I came up with a handful of ones and twos, including a one for the Hyrkanians, making them unreliable. My run of horrible pips continued for several turns, with the C in C unable to get the three pips needed to even attempt to activate the Hyrkanians.

This lead to a slightly cagey opening as I lacked the pips to do anything really, Wayne was cautious on my left as I clearly had the superior force, and on my right Dirk didn't want to get too close to the Hyrkanians and activate them. On the left the light horse forces spread out into two opposing lines, with neither side willing to advance and give the other the first charge.

LH stand off on the left.
On the right, Dirk surprised me with his Chionites as rather than attempting a flanking move around the oasis, he lined up in front of the pikes, and moved his bows up in support. I got the first charge in with pikes, but having forgotten that the rear rank doesn't count against light horse. it didn't achieve much.

Chionite LH(S) face off against pikes
The bows and horse archers carried on attacking the pikes, and started to inflict a few casualties. It looked very likely that they might get the four element lead in elements killed, needed to cause the Hyrkanians to change sides. When the Hyrkanians got a six on their pip dice, I took the precaution of turning the them around, so that if they did change sides, I could charge them in the rear.

Situation my left. Hyrkanians turning around as a precaution.
Still if the Hyrkanians were to change sides, it would be effectively game over, and being behind 4 to 1 in cassualties, it looked like they would unless I did something dramatic. On my left Wayne had brought some LH(O) over to support his LH(F) and this had enabled me to inch forward to within LH(F) charge reach, but outside of LH(O) reach, so that if he attacked me, not all his elements would reach.  I rolled my pip dice, and finally some decent pips.

LH clash on the left
Facing certain defeat otherwise, I used the pips to charge forwards and take my chances in the light horse lottery. Luckily, I had a winning ticket, as lady luck compensated for my dismal movement dice, with excellent combat dice, letting me even the casualty score, and gain a decisive edge on the left.

Still with it now being Wayne and Dirks bound, the pendulum could easily swing back the other way, and if it did they might yet nab the four extra elements needed to secure the services of the Parthian rebels. To this end, Dirk opted for maximum attack on my right, throwing his Chionite general into the fray in attempt to inflict as many casualties as possible.  The general duly obliged, dispatching a Pk(F), and following up into the second rank element.

Demise of the Chionite general
It was at this point that Dirk, who had hitherto played a flawless game, realized that he'd made the classic DBMM mistake of covering his general's flank, but forgetting to allow for the pursuit. Not wishing into to look a gift horse in the mouth, I flanking him with one of the light horse who'd been skulking in the oasis, and destroyed him. This together with the one casualty I'd previously inflicted was enough to break the Chionites (only a 16 ME command) and secure the loyalty of the Hyrkanians.

General stomping


On the other flank Wayne didn't inflict any significant damage on me, and a hole opened up in his line allowing me to hard flank his general too. This one survived but in his next bound declined to follow up after a victorious combat, allowing me to pull out LH he had been fighting, and replace it with an elephant general. Wayne needed a six one in his favour to survive, but it came out the other way, for a grand total of 12 factors to 1. This broke Wayne's light horse command on my left.

While I'd now broken two commands in three bounds, it was still far from game over. On my right the Chionite assault, supported by some withering fire from the bows in the C in C's command had done a lot of damage to my pike command, and a bit of stomping by some elephants finished them off. This left Wayne and Dirk down two small commands, and me down one large one.

Kushan elephants almost reach cataphracts
On my right the now active Hyrkanians faced off against Dirk and the C in C's command of cataphracts, elephants and bows. I tried using the Hyrkanian LH to get round behind him, but Dirk moved the bows to counter, and promptly shot down three of them, leading the remainder to retreat back whence they'd come. It was now just a matter of time before Dirk's elephants got into my cataphracts, and there could only be one outcome from that.

So now it was to race to see if I could finish Wayne on the left, before Dirk stomped me on the right. Wayne assisted me somewhat my moving forwards round the hill and engaging in an indecisive cataphract fight, while I rallied my forces from pursuit and closed in on his flank. His lone elephant on that side was making a bit of nuisance of himself, so I hatched a wizard plan to lure it forwards with some sacrificial horse archers, and allow me to attack it from the tail end. In the end the plan worked, but I'd forgotten that the two sacrificial elements came form a command that had already taken quite a few losses, and once I realized I was convinced that the extra two would be enough to break it. Luckily, a recount of losses saw me with 7 dead ME out of 21, half an ME short of breaking.

The final act on the left
This let me dispatch the elephant and an outflanked cataphract breaking Wayne's command and the thus the opposition army, just as Dirk was closing in for the final kill on the other side of the hill one. One more bound, and the game would have gone the other way.


A big thank you to Dirk for joining us, he played excellently despite his unfamiliarity with either the army or the scale, and it was great for us to put a face to one of the names from the Yahoo group.


Saturday, 25 August 2012

Yes where have all the elephants gone.

After five games in the Parthian civil war saga, we felt it was about time we wrapped it up, and played with something else, so we agreed on one final battle to settle things, with the loser going to into exile in Dubai.

So Watagases marched from the East with his bastardized Indo Parthians, and Bobarsaces summoned the renowned (or not) elephant slayers from Armenia, and the slightly less renowned cataphract slayers from Sarmatia. Although the elephants would still be a problem, I was confident that with the right ally they could be contained.

I tried to keep the battlefield fairly open to allow an opportunity to outflank the pachyderms and to avoid being forced into fighting them head on. The terrain of note was a BUA on my left, several gentle hiills spread throughout my deployment area, and small marsh in the center of Waynes deployment area. I deployed the Armenians in a long line from the BUA on the left along the hill nearest it, with the CinC and main cataphract force behind. The right was held by another command with some cataphracts and the bulk of the light horse. The Sarmations would play a wait and see game as a delayed command. The idea was that putting the Armenians in line out front would mean that it'd be hard for Wayne to avoid activating them if they were unreliable, that their light troops could contest both the BUA and the the little marsh, and that wherever the elephants were, there'd be some auxillia nearby to mask them.

My opening set up

Wayne's deployment surprised me a little as I didn't expect him to rest his catapract command's flank quite so closely on the BUA when I was likely to have better terrain troops. The absence of elephants was also a surprise, but without anywhere obvious to hide them, I assumed they were flank marching, and could safely be ignored as Wayne's flank marches only ever arrive when they've been pushed back by one of mine.

Initially I thought I'd try to break Wayne's small Saka ally first, but when that rode out far to my right, and he moved a whole lot of other light horse over to support it, I decided not to bother, and instead to set things up for the cataphract fight by occupying the BUA on the left, and the small central marsh that was to the right of where the main action would be. This meant sending most of the light horse from the CinC's command and the Armenians over to the right between the Saka and the reinforcements that were moving towards them, and sending a column of Armenian auxillia towards the small marsh to support the horse archers. The action in this salient essentially became the battle with both of us sending in more troops.  On the right side of the salient I had horse archers from three commands, but one command had poor pips, and the Armenians had other things to do, so Wayne was able to keep the initiative in the light horse fight, and inflict a large number of casualties.
An Armenian sneaks into the marsh while the battle rages on either side of their column
The salient fully formed. My heavies coming up in support

In the center of the salient I had more success getting one Armenian into the marsh, and forcing Wayne to throw Watagases himself into the fray, and also send in his remaining light horse reserves into the teeth of my advancing cataphracts. Watagases decided to go for glory and rode down an auxillia in the open, totally neglecting the one behind his flank. Needless to say the next bound he found himself flanked by it, attacked in front by another cataphract,  his horse archer flank support stripped off, and more cataphracts from my C in C's command threatening to get behind him. Indeed Bobarsaces attempt to close and finish things mano a mano was only thwarted by a light horse who needed to win by plus four on the dice to live, and did so twice in a row. Nevertheless, when we came to the climactic roll, I only needed even dice to kill Watagases. Unfortunately, he out rolled me decisively, not only not dying, but pushing the attackers back, allowing him to extricate himself from the predicament in the next bound with a smart tactical advance to the rear.

Surely this is the end for Watagases
This left many of my elements facing the hole where he'd previously been, and the rest of Wayne's army behind them. Their disarrayed state led to further losses, and combined with the drubbing I was getting in the light horse battle on the right, led to the loss of the army. Both Wayne's flank march and my Sarmations turned up before the final bell, but too late to make any difference.

While I did have a good chance to kill the opposing C in C, that was mostly down to Wayne.s mistake  rather than my great generalship. My battleplan has several shortcommings, most notably giving the Armenians way to much to do (take the BUA, take the marsh, and take part in the light horse battle), pushing a salient out between two light horse forces was always going to be tricky, and starting the Sarmations off table was a dumb idea, bourne mainly out of recent habit and good luck in the having them arrive in a timely manner. Oh and on the left, I screwed up the attack on the BUA my hanging my flank in the open allowing his cavalry to intervene, and the gap between the BUA and the hill was mainly held with wishful thinking rather than any troop elements.

So congratulations to Watagases for  a remarkable comeback, squaring the series, and as the previous incumbent reclaiming the throne. He's survived three successive defeats in battle, and assassination attempts by egg mayo sandwich, elephant buttocks, and good only fashioned hard flanking. Clearly he is beloved of the Gods, and thus the rightful Great King. I shall repair to Dubai and write my memoirs.

Wednesday, 22 August 2012

Where, Oh Where, Have The Elephants Gone?? (Parthian Civil War Part Six)


Bobarsaces did indeed survive*.  Just when I arrived at Ctesiphon to be re-crowned, who should show up, in full preening attire and equally vainly attended.  The usurper – again.  Some dogs just need to be dismembered to be sure they are indeed dead*.

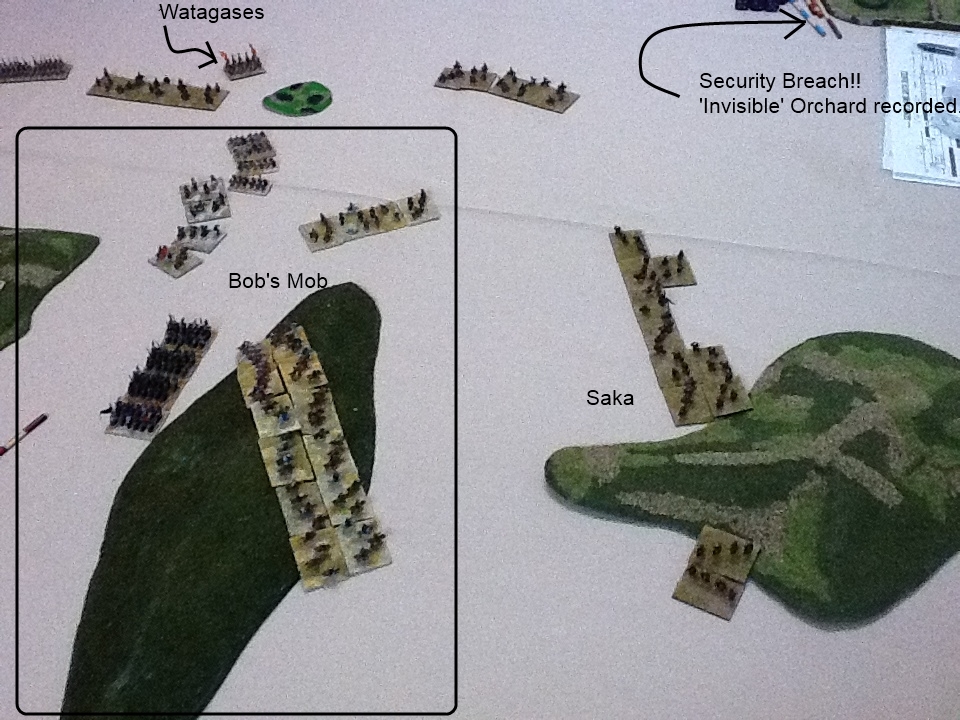
So on the eve of what is to be the final battle (as I’ve issued no quarter orders and will execute all above brigade level if his head isn’t on a spike set before me by the end of tomorrow), we are encamped in position on the open ground with our right flank resting on a BuA (supplying the usual urban delights for the nights feasts and entertainment) and our encampment stretches out over the plains into the distance.  Off in the horizon is a minor orchard, that may be so significant that I’ve ordered it’s not to be recorded by any of my scribes or artists (read – it’s not in any photos).  More of the ‘invisible’ orchard later.

The enemy, lead by the usurper Bobarsaces the Unspellable, the vain-glory lackey of big business date traders, are skulking in the hills being unable the face the glory of a real King of Kings in the light of day out on the open plains that are Parthia. 

The sun has risen and I ride forth to smite the enemy.  On the open plain, except for two micro-march areas, I stand with my wall-of-steel cataphracts stretching from my right all the way to the BuA (source of last night’s female delights) commanded by myself and a loyal general Watshisnameces.  Mucking around conspicuously** at the rear of the BuA are a bunch of Watshisnameces’ Indian foot. 

The cataphracts have their screen of horse archers plus I have more looking to our left flank plus a bunch of these Indian useless levies standing back by the baggage.  The Saka I hired this month are out forward and centre just in case they get ideas not to honour their contract***.  The other loyal general, Obsurarces, was sent early this morning away around the right flank to come on upcountry and roll over the hills from the outside. 

Before us, are four large gentle hills with five valleys where the enemy CinC lurks a long way behind a large expanse of Armenian allies.  On the right (his left) was one of his cronies leading a small but similar command.  Something was definitely missing although the minimums had all been met.  Given the rough behind our BuA I didn’t expect Bob to flank march on that flank so expected our off table command to be quite safe until it arrived.  Actually given the open enemy free expanse it should advance onto, including access to the enemy baggage I was quite looking forward to its arrival.  Bob was assuming it contained the missing elephants.  I anticipated Bob’s missing command would flank march on from our left past the ‘invisible’ orchard.
Usurper to the left, genuine King of Kings to the right
Cowardly leaders to the rear.
Impenetrable Wall-of-Steel (& screen) protects a micro-marsh.
 Despite invading, we deployed first and should move first. 

I, insignificant scribe of the great unrelenting fighter, the King of Kings, Watagases I, humbly known as Unnamedarce have been instructed to finish this tale of great martial and valiant feats of arms. 

As before we opened with great starting PiPs including a six for the allied Saka and a 5 for the flank march (which needs a 6).  Over the first four turns the flank march rolled four 5s in a row for PiPs and on the 5th attempt, needing a 5 or 6, you can guess how that went.  

With 6 PiPs the Saka went mad and ran off right around the outside of the enemy so that they threatened to immediately be in the rear of the outside command and in dangerous numbers.  Our glorious CinC had to send some horse archers after them to be sure our army wasn’t cut into two pieces.  The wall of steel just juggled its position slightly and on the right the idiot Indian foot, who’d messed up the ambush tried to get themselves back into order.  The opposing Armenians didn’t scare us, at worst it would be a stalemate but to be sure to win on that flank we awaited our flank march to arrive as they would arrive into the exposed enemy wing.  In the meantime this side would just do the minimum to keep out flank guarded, no aggressive action was intended.

Saka have gone long and wide (front right) and in response the enemy withdraw unto the hill.
At this point, barring the enemy’s missing command causing havoc, we had both enemy wings under pressure (I verbally slipped up at one point and indicated where our flank march was but Bob had already guessed, I think) and a continuous and strong front line threatening 80% of the enemy’s frontage.  The point of weakness, which I planned to use as a trap, was between the overly mobile Saka and the left end of the CinC’s command.  He had sent some LhF to the left to at least give a sense that we wanted the gap covered.

Apart from two micro-marches**** we were on a huge expanse of open terrain (with GHs only whose only effect is uphill combat factors, all other terrain touching table edges in the table corners) and on the left wing it felt like a open plain light horse duel, with lots of moment, circling, stopping and watching  but little closing to combat.  They was no actually fighting intended unless you had a clear advantage – and an exit option. 

To gain some advantage Bob sent LhF from three commands into the gap between my CinC command and the Saka ally along with some AxO aimed at a micro-march my side of mid table.  A column of cataphracts came behind to add some weight if needed.  Initially I didn’t feel threatened as the advance was containable and was drawing resources and future PiPs away from my awaited flank march.  Unfortunately an element of AxO got into the micro-march, from which it would be very hard for LhF to evict it, and caused some annoying threats to element flanks.  I countered by TZing it, and luckily moved my CinC into the area as heavy support but we suffered a time of lower PiPs and lost the local initiative. 
Bob pushes into the faux weak spot faster than expected.
Watagases himself comes to add some heavy support.
As Bob had started a more general advance that would use his advanced salient as a flanking benefit I decided I needed to deal with it before the flank march looked like arriving.  I intended to cut off the exposed salient with a pincer movement using two commands but again ran short on PiPs at an inopportune time. 
Ready to attempt the pincer attack.
The great warrior King of Kings, Watagases was leading from the front and got himself exposed and surrounded.
Enemy to the left of me, enemy to the right.
Despite the support this doesn’t look good.
 In an effort to extract him alive we tried both sacrificing LhF elements and removing Bob’s straight ahead moves so he needed 2PiPs per move to make contact with KnX and/or AxO.  At the point where the martial expert Watagases was hard flanked and fighting cataphracts, Bobarsaces sensing a decisive moment approaching, moved himself quite close to the action (and for the first point in the battle wasn’t the element in his command [or the army either by that point] that was the closest to the table edge) ready to take the glory earned by his minions.  And of course our desperate efforts didn’t work.

We had to resort to Plan ‘B’ *****.

Plan ‘B’ – Dicing your way out of trouble!!
At this moment our flank march announced it arrival, to support our troops who had been filling in time skirmishing and probing the Armenians in and around the BuA.  Immediately after Bob’s missing command turns up as a delayed command, so arrives on table before us.  It’s the Sarmatians (he had two allies!), the anti-cataphract all iKnF version and he chooses to aim them at our wall-of-steel (rather than try and support the mid-table battle of the salient) and run a risk from charging across the face of our flank march.  Maybe he expected the missing elephants to slow down our progress across the table due to a slower speed.

At this point knowing where everything now was located and where our flanks would or won’t be exposed, we ordered a general advance.  Bob had been taking a few casualties over his three on table commands and some decisive combat action could push any of them to dishearten soon and with our flank march now going to be in the enemy rear and into their baggage we needed the frontal contact for both damage and to control his options.

Our flank march came on, consisting of all light horse (both F and O) plus a KnX general.  No elephants in sight!!  With reasonable PiPs it split into two groups of light horse, the fast getting into baggage strike range and the ordinary marching over the first hill while the slow general was abandoned to his own devices.
Arrival of both the Sarmatians and the flank march plus a general advance on the main battleline.

As Bob had spent the game dealing with the potential of elephants arriving from somewhere, and had played with the thought of elephants repeating their previous carnage of his cataphract line*, it seemed only fair to now put him out of his misery. 


We released the news that the elephants were in fact picking dates in the ‘invisible’ orchard on the very left corner of the table.  So out they came, in column, but with half a table distance to cover to reach the battle they were never going to arrive in time. 
Date laden elephants wander out of the orchard.  Contribution - Nil.


Having extracted a much relieved****** Watagases we were in a position of having the upper hand in several positions across the table and used out superior numbers, troop quality (KnX on LhF) and dice rolling skills to wear down and break commands and thus the army. 

Final Positions - Bob's left flank.  Armenians broken, Sarmatians taking attacks in the flank.


Final positions - the Salient, Bob's right.  Commands and army broken and surrounded.
Bobarsaces himself, being a long long way from a table edge (almost in the dead centre of the table) didn’t escape this time and was captured [imagine the likely possible event the available LhF in the rear of a fleeing KnX].  In a moment of mercy he wasn’t executed but branded, castrated and exiled to a suitable neighbouring city-state.*******. 

A FINAL OBSERVATION
Watagases is yet to return to active leadership due to needing to clean-up outer and inner garments after so much personal exertions and danger.******  Unlike last week where the potential loss of the CinC was unintentional, this week I did it on purpose after much deliberation, in fact it was the first thing I considered that bound and yet the last action I took.  It wasn’t the move that was the problem it was the expected retaliations that may have been available to Bob.  Uncertainty abounded, yet I was in a strong position if the flank march came on and maybe should have waited for it to arrive.  In the end I pushed the CinC into a very dangerous situation and in the end needed to rely on better dice than Bob to get out him again. 

Putting the CinC is so much danger, was it worth it??  In hindsight, despite it coming off and the CinC surviving the answer is a resounding no.  It was a step too far into danger and the relatively high odds of it going bad on Bob’s subsequent bound could so easily have made it a disaster. 

But this is a rare occasion where doing a daft thing didn’t become a tale of woe for me.  Anyway I add the crown of Parthia to that of the Kush*.  A genuine King of Kings, so what is next??
  
* = See previous instalments.
** = A ambush which was so badly set that it was deployed in conflict with the rules, so was declared on bound one when the error was noted and thus placed on table and the surprise lost.  I had tried to ambush from an unfortified BuA.
*** = Bob can’t help but reactivate them if they become unreliable allies if he mounts any attack across the table centre.
**** = marches that are almost the smallest possible dimensions allowed, approx a 2x1 ½ base width oval, which I designed to be placed early in the terrain layout process to block the opponent’s choices/chances of placing other annoying terrain in the area.  Used especially by open terrain (all mounted) armies to control strong terrain based armies getting overly favourable terrain.  Sometimes they are very successful in their job but mostly disappointing due to the random factors involved.  A mildly gamey ploy to get some advantage from the terrain rules system that I think is both balanced and robust.
***** = Plan ‘B’, for every army I own and every battle I fight is simple – “if all else fails, dice your way out of trouble”.  Doesn’t have a high success rate though.
****** = The offending scribe who suggests the great leader was anything other than confident and capable in all military activities has since been painfully executed.
******* = In Thailand all losers of military endeavours (coups) gets exiled to Dubai.  Those with local political knowledge will understand.
(right) A slightly startled Bob[arsaces] contemplates the exile to Dubai while (left) the victor looks forward to reinstated pleasures.
[Also known as "how does the front camera om this iPad work??]
You will now have noticed I've worked out a lot about how to mark-up the photos now.  A frustrating time but perseverance has paid off, hence it's over use.  Now to work out where the colour changer is.