Wednesday, 22 July 2015

The Protagonists IV - The Petrashop Boys

"On a hiding to nothing..."

As readers of this blog may remember, we DBMM’s in Bangkok have played out three mini campaigns over the last few years and the battle reports were posted for all to critique.  (See reports from February 2012 to September 2014).

Miraculously, I have come out the victor in all three previous events (okay, the first two had only win or lose options!) and with a few more potential but inexperienced players joining the next mini-campaign it would be a bit embarrassing to make it four in a row.  In addition, having played the last two events as Parthians, it was frowned upon to use them once more.

So in a move of unexplained (and out of character) sportsmanship I suggested playing the toothless Arabo-Aramaeans [Bk 2/22] as the only non-Parthian alternative army I possessed that fitted into the 1st century BC Syrian area campaign that was proposed.  As an army it is singularly without any attacking virtues and reliant on using it’s very low aggression and terrain options to absorb enemy attacks and counter-attack at the weakened enemy.

As it turned out the campaign rules subsequently went through some modifications, the number of players dropped to four and the selected armies became possibly the worst conceivable combination to face as each contained significant numbers of my natural enemies.  Furthermore, the re-arranged campaign rules for selecting allies*, while clever in themselves, further played against my army as it increased the number of my natural enemy elements in play while my own high minimums restricted my ability to use the stronger/more expensive allies.

However, we encourage cunningness and deviousness so that became the path I would have to follow, with unusual terrain layouts using uncommon terrain selects to try an cause the enemy to engage on my terms so that I could then strike back at their weakened areas.

I had to make a choice on the sub-list restrictions so chose the Nabataean city of Petra.  This gave me a mostly irregular army with regular generals and the option to switch the few non-LhF (light horse archers) mounted troops between fast Knights or Cavalry on a game by game basis.  I gave up the option of cataphracts (iKnX) because I saw no benefits in fighting any of the three known enemy armies with these type of knights.  I did, however, think the rare ability to bring significant ‘dry stone walls’ (TF-temporary fortifications) with this choice of city as being another unusual weapon in the arsenal.

However we also had a campaign structure that had the campaign won (or lost) on the “top table” while other preparatory games had other benefits but not directly able to win the campaign.  Because of the draw I was to engage in two preparatory games prior to a chance at the “top table”.  My tricks and ploys would be saved for the top table battles, earlier games being used to test other options.

By some devious date setting I got onto the bottom of the table of players so would be the last to challenge on the “top table” and had the two “side/preparatory” games to experiment in, the first against Bob’s Ptolemies and the second against the loser of the first top table game.

So for this campaign I am Wanazab the Ay-Rab, Emir of Military Affairs for the Nabataean city of Petra, assisted by the other Petrashop Boys,  Sal-Ah-Noyz (as audibly enabled as his later more famous descendant) and Ali Sheap Bleet (of the past flying carpets merchant fame family).  We really just want to guard our cities peace and regulated market places and our trade routes but the faceless council of greedy elders have decreed that we should be expanding vigorously.  This can only end in tears.

First Game

In a build up game Petra, for reasons unknown but most likely to do with disrupted trade, headed south to chastise the muscle flexing Ptolemies.  We meet on the banks of the upstream Nile in a battle where the centres didn’t engage and the artist-scribes were scared from the field very early (that is we didn’t take photos). 

The tactic to be tested here was an unexpectedly large light horse command, big enough to look normal with 8 elements also in ambush.  The Aramaeans are not expected to field the LhF in large numbers due to the high numbers of compulsory bow and to do both, plus a couple of decent stretches of stone walls I gave up taking an ally at all.  The idea was that the Ptolemies being a mostly pike and expensive foot army would be vulnerable to the 18 LhF sweeping around and behind them.  I was also gambling the their compulsory terrain (S or WW or Rv) wouldn’t be chosen as a river as either the sea or waterway would secure a flank and draw them to deploy in that direction giving scope to go wide on the opposite flank.  Besides the pike block the enemy would bring knights in a light wedge formation (rKnFsbw) which while deadly against foot in the open, doesn’t allow them the normal knightly destruction of cavalry (QK = quick kill effect) so my heavier mounted were classed (equipped) as cavalry not knights as a blocking agent.  To protect my foot I planned to use stone walls in their front, very effect against all that the Ptolemies could bring, with camel and psiloi infested dunes on their flanks.  My mounted would be in reserve or sent to win by outflanking the enemy.

Actually not a very strong plan in an aggressive sense but should be sound defensively.  Unfortunately, games aren’t won on the defensive, an issue I would have all campaign.

In the game the terrain fell well for the defensive approach although I would have to advance into a dune area in the centre of the table a small distance (two base widths) from the waterway to secure my left flank.  Unfortunately my cavalry was on the wrong flank to engage the enemy knights, a matter made worse when Bob unexpectedly decided to push the knights between the waterway and sand dunes which if successful would create havoc behind my lines.  I rushed a large group of light horse into the area where he would emerge from the gap but held them in station to threaten to envelop the knights rather than take them head on.  My camel riding scouts (LhI) and psiloi in the area immediately pushed into the dunes, with the triple purpose of avoiding the knights, threatening their flanks and also threatening the flanks of the pike block should they actually charge the troops defending the wall.

An additional surprise was Bob’s entry into the dunes with six superior auxilia (plus two psiloi) in two columns with a clear intention of clearing it of threats.  I expected my camels to be up to the task as they had plenty of psiloi support themselves but once combat was engaged the factors weren’t as clearly in my favour as I expected.  In the end, even against the poor odds that came as a surprise to me, after some hard fighting (and Bob’s unfortunate dice) we still finished the battle in possession of the dunes if only due to some luck.

However it became clear that this flank was the focus of Bob’s attack so I shifted, at great PiP cost, the cavalry from my right flank to the left.  The knights came out of the gap to fight and while I took a number of light horse casualties the “L” shape defence I used allowed the light horse to slip in a couple of rear attacks and in the end all knights but the general were destroyed and the enemy command broken.

But my right flank was now weak and the small number of light horse trying to delay the remainder of Bob’s mounted from outflanking us were eventually caught and then collapsed quickly (and broken due to the casualties inflicted on the command by the knights on the other side of the table) leaving the wall defensive position out-flanked.  A sterling effort was put up by the defenders but it wasn’t long enough to allow the cavalry to again transverse the table to the rescue, and with mounted in front, flanking and behind them they took enough damage to break.  Game over 6-19.

So having been caught out by Bob’s attack on my left where it wasn’t expected and needing the light horse to deal with the threat I never got to try the massed light horse outflank idea I had originally planned.  Maybe next time.

Second Game

Anthony had tried to use the Parthians in an uncharacteristic way on the top table and had (to the surprise of a couple of people) nearly pulled it off.  But in the end, after mutual CinC destruction, Nash’s woeman’s had secured a narrow victory so Anthony picked up the lowest spot on the table and got a ‘side’ game against Petra’s finest.  In the non-standard invade/defend rules the campaign utilises Anthony chose to invade (a “Dry” enemy) in the summer!!  I couldn’t work out why.

My pre-game planning involved swapping the cavalry into (regular) knights to prevent them becoming cataphracts fodder and maybe even give the cataphracts a fright themselves.  Give the invasion in the summer a thirst event was on the cards so I decided I must have a BuA (Built up area) and in fact took a two element square fortified BuA on a difficult hill I’d custom built for the previous campaign (where it failed to have positive effects) from which I could ambush six light horse.  Its placement was still a bit random but it was to go where it would cause the maximum discomfort for Anthony’s deployment and be manned by bowmen to keep it influence real.  Otherwise the list remained much the same as the previous game.

On the day the terrain fell favourably and deployment was quite straight forward.  The weather didn’t throw up the hoped for (against all odds of course) “thirst” condition.  Anthony appeared with only two commands on table, one with such an oversupply of cataphracts that it had to be an exaggerated sized command and he also actioned a delayed battle stratagem which I was less than familiar with and it didn’t register that it meant a flanking (or delayed) command.  His other surprise was the use of his Galatian ally, massed warband with a few cavalry which while needing to cover a lot of ground had a juicy bow and blade target directly ahead in my line.

Battle on, and I moved the warband targets, plus CinC, out off in-front of the warband but these were on low PiPs and while they got away didn’t do much else in the game.  I filled the gap they created with my few regular fast knights to receive the warband and pushed the camel scouts into the dunes in the centre of Anthony’s deployment area where he had no answer to them (instead he used troops and PiPs all game to keep them there rather than have the camels catch him in the rear).  Lastly, I send the large group of light horse (with high PiPs) wide around the left flank to threaten the cataphracts flank and rear and to burst their bogus numbers.  This move Anthony countered with three light horse of his own which we meet on a gentle hill and expected to use our numbers to sweep them aside but his dice held up very well and we were stalled until he had time to get the cataphracts into play piecemeal. 

About this time Anthony’s masterplan became evident, flank marches on both flanks and I fell for it.  I released the ambush from the hill fort to run wide and into the Parthian’s rear but got the march move mechanisms wrong and the Galatian cavalry, still hanging back due to lack of PiPs, was able to nullify it’s effect and I was also surprised how ineffective my knights were in dealing with the massed warband, even though we match the frontage and had secure flanks, as the knightly quick kill was uncommon due to the combat factors being so even.  So we bogged down and eventually the “F” effect cost us an element and the line was breached.  By that time we had Parthians in the rear over 40% of our line and we were well beaten,  2-23.

Anthony came with a total plan, executed it well and as a result out played me completely.  Well done!!

Now I must face Bob’s Ptolemies on the “top table” next, having also previously lost to them and confidence is not high.  Thus queue – bizarre plans!!


* =      List allies are ignored (unavailable) while a local area list of eight allies (those we had enough figures for!) were available to all but are ranked by player so that through a couple of campaign rules we have a sub-game where it is possible to manoeuvre allies away from your opponents and into your own camp.  

Tuesday, 21 July 2015

Luck of The Egyptians: Syrian Campaign Round 2

Last week's game saw Nash and his Romans defeat Anthony and his Parthains to secure Syria and grab the position of King of the Table. This week it was King Btobemy's turn to play on the challenge table and try to unseat the reigning KotT. As per the campaign rules, the attacker and defender were determined before picking an OoB and with Nash electing to stay home and mind the goats, I would be the attacker.

King Btobemy trying out a new mount
In addition to the usual things to think about when planning a battle, the campaign adds two extra elements to consider, bonus points and ally selection.

The winner of each game (on either challenge or side tables) gains a number of bonus points equal to their score using the standard game system (so 13 to 25) which can be saved up and used in future games. They may be used to buy stratagems, TF or PF, up to six horde elements, or elements from the army list at double cost.

Unlike the previous campaign, we don't use the allies from the army list, instead their is a common pool of eight allies that we all choose from. In order to prevent both sides picking the same ally, and to add a very simple element of diplomacy, we all ranked the allies in preference order at the start of the campaign. For any given battle, you may only use those allies you've assigned a higher preference to than your opponent. There is the additional wrinkle that if you lose a game while using an ally (or win but the ally is shattered) you can't use that ally again.

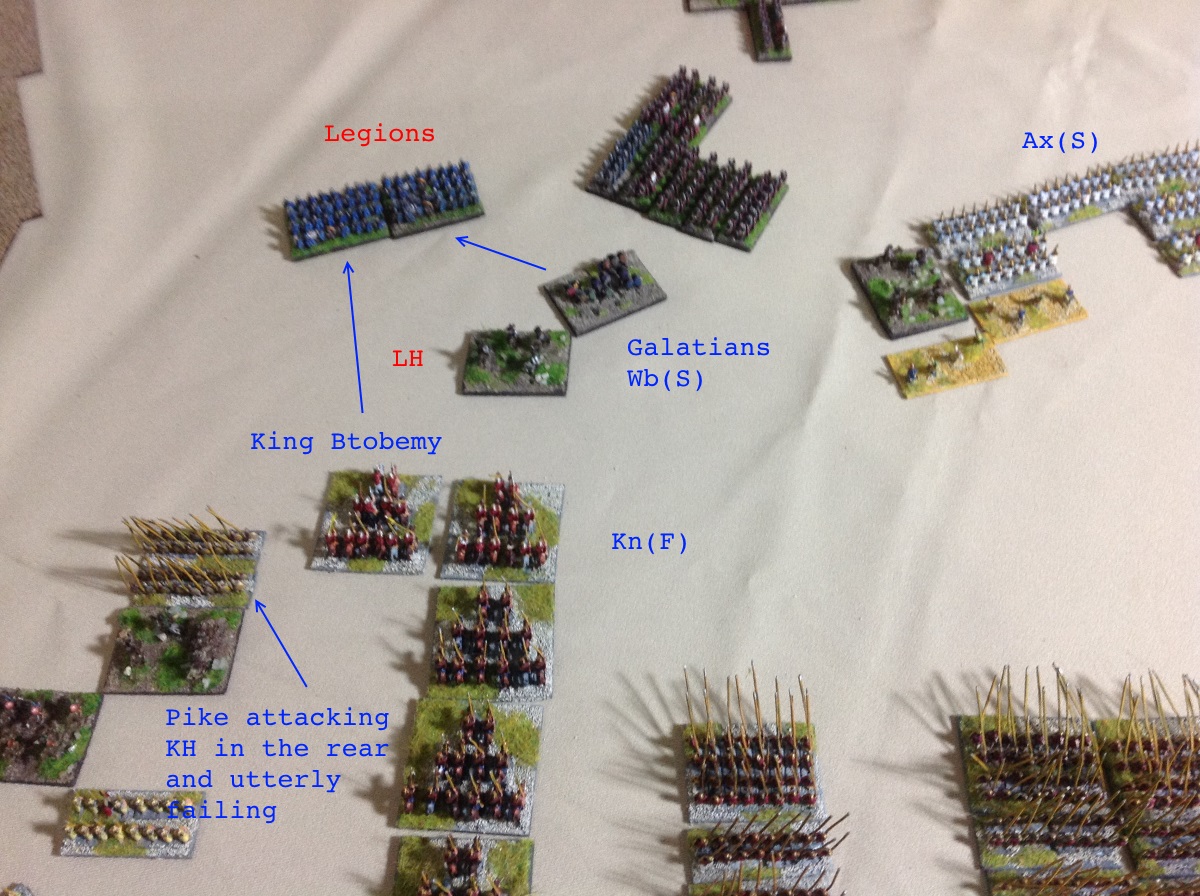
So what should I pick to defeat Nash. His Romans are a very tough versatile army, and he has a lot experience using them. It was no major weaknesses, but there are some avenues of attack. His legions might with a bit of luck be swept away by knights or warbands, the large cavalry wing he habitually employs might be defeated by knights (but not the knight wedges in my army list), and I have more difficult terrain troops. Nash was obviously well aware of the dangers posed by the Sarmatians, picking them as his top ally and thus denying them to me. I'd picked the Galatians as my top ally with the intention of using them against Nash, but elected to keep them in reserve for games in later rounds. I also thought about using a Rhoxolani command to boost my cavalry which would otherwise be outnumbered, but in the end I stuck with a three command army from my own list, very similar to the one from the last game. However, I dropped one of the elephants and instead employed 4 elements of Galation (Warband S) mercenaries to boost my chances against the legions. I spend 19 of my 34 bonus points on scouting and ambush stratagems and and additional 4 points on troops (as my total troop elements came to 402 points).

I picked two sand dunes for my terrain (as they narrow the central portion of the table more than a Waterway) and Nash had a couple of oil wells (minimum size marshes) a BUA and a gentle hill. Most of the significant terrain fell on the right side of the table, with just the hill and the oil well to the left. This gave the Romans a bit more space to run around in than I'd hoped, but at least allowed me to secure one flank the various bits of bad going on the right.

Deployment 
My plan was to crush the legions with my phalanx and Galatians, and to this end I split the Galations into two pairs with each having a phalanx block on both flanks, the idea being that the pike blocks would push things back giving the Galatians a double overlap and a great chance of a kill. The maximized my offensive potential, but meant that wheeling would be more difficult with irregulars mixed in, and I'd lose my free march move with the pikes.

I expected the terrain on the right to be lousy with Roman light troops, so decided not to waste pips fighting there, but to mask it with the peltasts from my right hand command. The cavalry from that command would be sent to assist the left, and knight wedges would also go left, or attack the legions if they overlapped the right of the phalanx. On the left was a mixed force of peltasts cavalry and a lone elephant whose job was to protect the left of the phalanx, and not to lose to quickly. Many elements were thrown forwards to delay the Romans marching around my left flank.

The Romans deployed with the legions on their left, with a small pip dump command of horde and a couple of blades on their left flank. To the right of the legions was a massed command of Roman cavalry lead by the C in C (Rollius Sixus) and an elephant. On their far left, was the surprise package, a Skythian ally with horse archers and four noble knight elements. I was quite happy to see the latter, as previous experience has shown they meet far more death than glory.

Relief Column
The game opened with the Roman cavalry advancing on my left, and the legions forming column and moving away from my phalanx. I pushed forward with the phalanx, but it suffered a dearth of pips all game, and I was never able to re-orient it properly towards the legions. On my left I withdrew my pickets, and began moving the mounted from right across to reinforce.

It was clear that this going to be one of those games that turned 90 degrees and would be fought along the long axis. With the legions getting away, I pushed the phalanx forward as fast as possible, even at the expense of allowing a flank attack on the left of the line by Roman light horse. It was 3 vs 3, but I lost and had to remove two elements of pike. Still it was a big command, and the Roman cavalry had been lured into a fight.

A messy fight now developed between the Roman cavalry and my peltasts and the leftmost elements of the Phalanx. My elephant did good work bagging a couple of horse, but the Romans had the numbers, and that began to tell. Meanwhile my phalanx command scored 1 on its pip dice for five bounds in a row (it was assigned the lowest dice, but even so it should only get a one about forty percent of the time), and in order to prevent more losses from flank attack, I had to allow the Galatians to rush off impetuously, to their doom I feared.

At this stage, things weren't looking good. My right wing wasn't in the fight, my phalanx was stalled, split into multiple groups nowhere near their target, my left flank was starting to crumble and the Skythians had finally got around the left, and their knights were poised to sweep away my cavalry at the end of the line. However, their was one glimmer of hope, in that the Roman CinC who'd been bringing the elephant up was now in line with it, and a gap in the line allowed my cavalry to flank the elephant, turning it round and placing him in the death zone. One good roll, and the elephants would stampede trampling Rollius Sixtus into the ground. Nash rolls his dice ... a one... maybe I'm still in this, but then I roll mine and it comes up two. Three would have been enough, but Rollius Sixtus lives to scurry away. All seemed lost.

Final Attack on Legion
At this point, Fortuna decided to take a hand. One pair of the Galatians who'd rushed off ahead of the army had been dispatched, but the others were nearing some legionaries. Not wanting to take any chances, Nash moved out his cavalry general in command of the legions to confront them, apparently unaware that cavalry flee from warband if beaten, and failing to leave enough space for them to fully recoil. A bad die roll saw the general defeated, forced to flee, and dying for lack of recoil space. The victorious Galatians then piled into the legionaries, killing a pair of them, and with the C in C King Btobemy himself who'd come up in support, killing another, the legionary command was broken.

Psiloi win the day
On the left my good fortune continued. The Skythain general charged into combat with my cavalry, and promptly died to a six one result. I then counter attacked flanking and killing another Skythian noble, and a dishearten psiloi attacked the Roman elephant, killing it and another Skythain noble behind. With two commands down, the Roman army was defeated, and somehow I'd won the game.

Phew !!!.


So now Btobemy is King of the Table, and awaits the challenge of Waynazab and his Nabateans.


Thursday, 16 July 2015

The Protagonists III: The Great Parthian Family of Artemita

Piriteze the Irritable of Artemita (a name not to be sneezed at - look it up) declares his intention to rid the Western borders of Parthia of wimpy moustache-less foreigners and unite the lands of bronzed moustachioed manliness in the name of King Mithradates II, the King of Kings. He is therefore assembling a mighty force of gallant Parthian horsemen that will soon be riding on Damascus to secure this jewel and the lands surrounding it (especially a little bay just to the north of Tyre that is absolutely gorgeous and looks like the ideal spot to retire to and top up the suntan from time to time).

Update from the front:
Scouting revealed a horde of Romans marching from the north as Piriteze approached Damascus.  He therefore boldly moved to intercept and destroy them. The Romans, hearing of his advance, started to quake in their sandals and called for more Roman reinforcements.  (A dastardly trick if ever there was one.)  But this did not deter brave Piriteze and he gave battle amongst the hills and orchards on the road to Damascus.

The Romans, though, are full of dirty tricks and one moustache-less creature crept up behind him and stabbed him in the back.  With their general down, the Parthians wavered and were forced to concede the field.

Latest:
After hearing of Piriteze's demise, the clan in Artemita has vowed to avenge his death and have amassed a new army to be led by Piriteze's younger (and, many say, more able) brother Veletri the Valiant. His determination to avenge his brother's death and secure Damascus in his name is second only to the length of his moustache - a mindset that will inevitably spread fear amongst all who stand in his way. 

Wednesday, 15 July 2015

The Protagonists II. The Ptolemies

Since cataphracts featured so heavily in the last campaign, we wanted some different troop types for this campaign, and hence the conflict in Syria more or less chose itself as the only arena where we could field enough compatible armies.

I figured I'd be something Hellenistic as I had suitable figures to use from the Bactrian Greek army. There were only two Hellenistic powers standing by this date though, and with the Seleucids having too many cataphracts, and being but a shadow of their former selves, that left the Ptolemaic Egyptians. So I shall give battle as king Btobemy of Egypt, the first (and probably last) of his name*.

I've never really looked at the list much before, but it turns out to be a handy army. The core of pikemen is augmented with lots of peltasts (Ax(S)) for controlling difficult terrain, cavalry wedges that are excellent at killing Romans, and there's a good selection of mercenaries available from Elephants to ferocious Galatian swordsmen. The standard pikemen can also be augmented with superior guardsmen (Pk(S)) but that'd mean I'd have to paint them, so they'll only be used if really needed.

Battle plans should be pretty simple, some terrain to close down the table, then hey diddle diddle, straight up the middle with the pikey boys. Peltasts, elephants and wedges will deal with anyone wanting a nibble at their flanks.

That then was the plan in their first outing, a side table** game against Wayne's Nabateans, and a waterway on one flank, sand dunes next to it, and a BUA on the other meant the terrain was set up perfectly. However, when Wayne deployed, I found that the cunning Arab had stymied my simple and elegant plan by building a wall (dry stone wall TF) all across the centre of the table manned with two dozen bow elements. A quick check of the rules showed that rather than the factors of 7 vs 3 I'd been anticipating for pikes vs bows, I would now get 4 vs 6. The pikes therefore moved up to just outside shooting distance from the wall and stayed there for the whole game.

Needing to do something different I attempted to seize the sand dunes next to the waterway with my peltasts, while sending my heavy cavalry through a narrow gap between the dunes and the water to outflank the wall. The peltasts outclassed anything in the other army, and I expected them to seize the dunes easily and ease the exit of the cavalry from the narrow gap. However, they failed miserably in their task rolling a whole bucket load of ones, and allowing Wayne to adroitly bottle up my cavalry column by transferring his own cavalry from the other wing. My cavalry wedges tried to bust their way out of the gap, but while doing some damage, the were defeated and broken.

With two plans foiled, and cursing my dice, I switched my attention to the other flank, and tried to work around the wall from that side. Here I deployed more peltasts and some Galatian mercenary cavalry. Wayne's flank was guarded my a large command of horse archers, but as soon contact was made my dice luck switched around and Wayne's flank guard was swept away and broken within a couple of bounds. With their position behind the wall hopelessly outflanked, and no more reserves, the Nabatean's positions crumbled. A nineteen - six win for the Ptolemies then, and nineteen valuable bonus points to use in the challenge game against Nash and Romans.

* Some of you more scurrilously minded folk (I'm looking at you Suetonious's grandad) may be wondering whether Btobemy really married his sister. Well damnright he did, as she's well hot, and looks just like a young Elizabeth Taylor.

** One day someone will make a post about the campaign rules, but basically there are two games each round, a challenge game which will eventually determine the campaign winner, and side table game where you can win bonus AP to use in the challenge games.


Sunday, 12 July 2015

All Roads Lead to Damascus - The Protagonists: 1 The Marian Romans

Rome in this period is still a Republic, but she teeters on the verge of becoming a Principality. Power is slowly be wrested away from the Senate and the people and is falling more under the spell of one great family, The Familia Prope Fraxinum.

At the start of the campaign the family led by Pulcher, has its claws deep within the Senate and the military. Popular with the mob and with equestrian (noble) families alike, the position looks favourable for the Prope Fraxinum. As Rome, is pushed further into military commitments in the East, so the family will tighten its grip on the Republic through clever manipulation of the legions and nepotist promotions within the military and the senate. When the time is right, they will declare the head of the family as Principal of Rome, Emperor of the Roman Empire.

The Roman army at this time is based round the legions which were mostly heavy infantry organised into cohorts (see the following link for a detailed account: https://en.wikipedia.org/wiki/Marian_reforms). The legionaries fought in close order with shield, pilum, and gladius. The Romans themselves had very little cavalry and few light troops. The majority of these were supplied by auxilliary troops supplied by annexed nations and mostly fighting in their native style.

In DBMM game terms, the Marian Roman army is fairly flexible. It has a Regular command structure and a strong core of Regular Blades (legionaries). The blades are good in open terrain and hold their own in rough or even difficult terrain. The optional troops add to this flexibility. The option to field Cavalry, Light Horse, Auxilliaries, Psiloi, Artillery, and even an African Elephant gives the Romans an almost 'swiss-army-knife' feel to them. They pretty much have something for every occasion. This makes them a fairly easy army to use and a difficult one to play against.  The downside is that sometimes there are too many bits and pieces and not enough of any given troop type other than blades.

The Roman player, Nash, is from the UK (born in Wales and brought up in Staffordshire). He has lived in S.E.Asia for 15 years or more. His gaming background included a period of competitive DBM play, and attending tournaments was a regular pastime - his claim to fame being 3rd place in The World's at Derby one year! Unfortunately, this DBM heritage sometimes gets in the way of DBMM play (rules and combat factor changes ) as occurred in the first campaign game much to his chagrin. He rather fancies his chances in the campaign for two reasons:
1. he is using the Romans
2. losing last year's campaign taught him some valuable lessons

Should anyone be interested in playing DBMM or other games in Bangkok, or would like to comment he can be contacted here or at monkey.nash@gmail.com


All Roads Lead to Damascus (or A brief Introduction To Our Latest Campaign)

Circa 100BC, 4 great nations have risen to dominate the ancient world: Rome, in the West, Parthia in the East, Ptolemaic Egypt in the South, and the Arabian City States in the South East. These four super powers are now expanding their frontiers to clash upon borders of the others. There can be no alliances, there can be no forgiveness, and there can be no negotiation. There can be only WAR!


Rome is quickly spreading her sphere of influence further East through Asia Minor and into the rich trade routes of the desert frontier. 

The Parthians are pushing west to reach the shores of the Mediterranean and its valuable resources. 

The Ptolomies have their sights set on their ancestral homeland, Greece. 

And the Arabian City States are pushing north west to control the trade between East and West and the vast riches there-entailed.   

There is one place that holds the key to each of their ambitions, and it is there that the fate of civilisation will be decided once and for all. It is there that we will make history or die in the trying and that place is DAMASCUS!


All Roads Lead To Damascus - Battle Report 1

Barbarians Get Awkward in the Orchard
or
Village People Go East

Report by our scribe in the field Dubius Factus.


This week saw a valiant defence of our Republic and the loss of a true Roman hero. Roman soil was soiled by filth of a barbarian horde. The Gods were with us and the horde was sent packing!

The day began well for our illustrious general, Legatus Pulcher Prope Fraxinum, who although late in years was still considered a strategic genius. The invading barbarians with their dodgy facial hair, leather fetishes, and love of anything a little fruity' were easily lead to an area heavy with orchards and steep hills, thus funnelling their advances exactly where our hero wanted them.  Upon entrapping the enemy in this constricting terrain, further advantage was gained by enticing the horde with promises of dancing and sweet drinks at the fable temple of the Blue Oyster. The Parthians in such a hurry to quench their queer desires, deployed first and Pulcher was able to take advantage. The barbarians scouted the area well uncovering our ambushes, but this was planned and accounted for.

The moustachioed villains deployed four commands with their cataphracts and horse archers on the flanks and a mass of light infantry and Psidian allies crammed into the orchard (no doubt trying to locate the fruits of Temple of the Blue Oyster!). The marvellous Romans deployed all 4 commands to their right flank with cavalry and legions ready to advance upon the unwashed heathens.  Two ambushes were prepared, one on the hill to the left flank and another in the orchard to the right flank.

The Parthians had the initiative but in an act of cowardly ignobleness, immediately turned tail (as if already in the Blue Oyster!) and tried to flee the field. Pulcher in turn was hesitant (rolling three 1s for regular commands), expecting some barbarian trickery. His ally general Rolus Asixus however, saw the Parthians retreat for what it was and was quick to charge across the field. Cavalry, Legions and Peltasts all advancing to close the gap and trap the savages.
And thus the battle was engaged. The valiant Romans pushed the attack on their right flank whilst the Parthians sought without success to escape.  On the left flank, the psiloi on the difficult hill proved enough of a distraction and hindrance to effectively negate Parthian efforts. In the centre, the Roman auxiliary were outnumbered but held on.


Having trapped the Parthians from escaping on the right flank, the Thracian light horse (o) pinned the cataphracts in place and launched an attack on the few horse archers (f) guarding their flank. The Thracians did their job and punched a hole in the Parthian line. Trapped and outflanked their days were numbered. It was then that barbarian heavy knights decided to actually fight. The CiC supported one of his brethren against sole Roman cavalry alae.  The barbarians, encumbered by their facial hair, leather and studs, were destroyed with great violence. That was enough to break their spirit!

Pulcher himself at this time stepped to the fray as he felt his years upon him. His closest aids tell us that he saw the battle was won on the right flank and his job was done, thus he wished to end his days in glory upon the field of battle. He is quoted as saying, ‘I am long in years, old beyond reckoning. The fields of Elysium await me. Let me die here in glory!’ as he charged the enemy foot.  The battle raged and he was driven back by a stubborn foe. It was while falling back that old age finally caught up with the old warrior. He slid from his horse, happy in the knowledge that his day was glorious.* / **

With the CiC fallen, his very small command broke. However, there was little effect on the army and on the right flank the Parthian CiC was fleeing with the remnants of his broken command. He was ridden down in eternal shame with his back to the enemy and his (or someone else’s) tail between his legs.  The Roman army was in a fine position to move into the rear of the enemy. The baggage was undefended and the Psidians exposed.  Alas that time favoured the barbarians this time and the battle was forced to end.

The result: a glorious victory for the Republic ***. An honourable death for a long lived and loyal son of Rome. A dark day for the invaders. And the start of a new era for the newly appointed Legatus Rolus Asixus!

*Actually, the cic was 6-1ed by the auxiliary. Now, this should not have killed him but for the fact that I for some reason reverted to DBM (not dbmm) factors! Anyway, the mistake was made and not noticed until sometime later

** It could also be that old age caught up with him as he awaited the Parthians to finish their moves!

*** It should have been a bigger victory. In the end the result was close 14 - 11 I believe.  Anthony is a newish player to DBMM and his plan was too ambitious for his irregular army. In other ways he played well though.


We were fortunate enough to interview Legatus Pulcher Prope Fraxinum prior to the engagement and discuss his plans.

Dubius Factus: Legatus, What is your opinion of the Parthian army?

Legatus Pulcher:  The Parthians have 2 strengths. The first is in their highly mobile and flexible Light Horse. The second is their Heavy Cataphracts. They may also outnumber us.

DF: Does this worry you?
LP: Worry, no. But I do have to consider their strengths and weaknesses. If the light horse envelope us then we could have problems. If the Cataphracts attack our cavalry we will be in trouble. Therefore, I must do two things: stop the LH from going around our flank, and keep their cataphracts away from our cavalry.

DF: How do you plan to do this?
LP: By choosing my ground very carefully and by attacking with a combination of troops, this forcing the enemy into my killing ground against the troops that I want them to fight.  The battlefield needs to be dense with difficult terrain to channel the enemy. If it is an open battlefield we will not be able to stop him. Our troops are better trained than the barbarians and we will be able to manoeuvre more effectively through gaps in the terrain. We will be able to reduce the battle to a small area thus negating his speed and flexibility.

DF: Are the cataphracts a great danger?
LP: Yes. They are deadly against our cavalry and against the legions. However, given the choice, I will attack them with the legions as we should win on attrition. The ideal situation though is to create a situation in which the cataphracts are unable to join battle. Our easiest targets are the horse archers. Although fast, if they can be pinned down they will be destroyed. Again, the terrain is key. We will draw them into our defensive positions in the hills and orchards.

DF: You have a choice of allies, which will you take?
LP: My first choice was to take Sarmatians as their heavy knights (kn f) will be an equal threat to the enemy knights. However, after some deliberation it was decided that this would be too much in the hands of Fortuna. My next choice was Skythians with their unnumbered horse archers, but again that was a risky choice. In the end, I chose to enlist my own nephew Rolus Asixus. With him commanding half the legions and cavalry it would allow me greater numbers and more flexibility with my commands. Regular troops are also more reliable.


DF: What is your opinion of the Parthian general?
LP: I have a great deal of respect for him - I would be foolish not to. But, he will over complicate his plan. I am not sure how, but he will. I will expect him to try to draw us into open ground, but we will force him into the hills. I also expect him to outscout us, but we will set up ambushes anyway. If he brings foot, we will outclass them. If he brings mounted, we will close the battlefield around them. Either way, we will be victorious.

DF: Legatus Pulcher Prope Faxinum, thank you and may Mars smile upon you for the glory of Rome.

LP: Thank you. Ave.